swapping 1998 V8/4R70W/4406 into 1999 SOHC 2wd | Page 6 | Ford Explorer Forums - Serious Explorations

  • Register Today It's free!

swapping 1998 V8/4R70W/4406 into 1999 SOHC 2wd

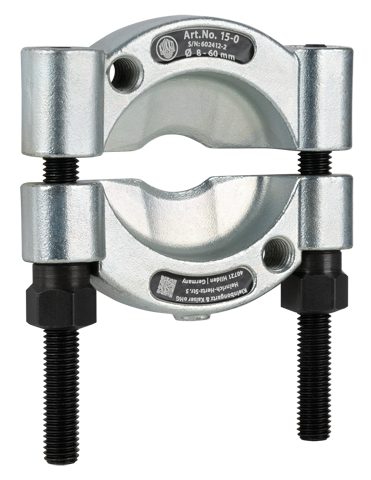
It your link, I read something about it is pressed on. You may have to use a bearing separator tool like this and a hydraulic press to remove it.
I'm just guessing though. Later today I'm sure someone else will chime in.


Join the Elite Explorers for $20 each year.
Elite Explorer members see no advertisements, no banner ads, no double underlined links,.
Add an avatar, upload photo attachments, and more!
.


If you end up using a bearing separator/puller, put some tension on the item, and then heat it. You’ll hear a pop when it lets go, then you can crank it the rest of the way off. Best way of doing it.


the only info i found is i actually cut one of these off one time...and then installed the check ball and speedo drive gear bby grinding a half circle into the output shaft
so I think it is pressed on you will need heat

IMG_1508.JPG


pic is fuzzy but Im pretty sure I cut the tone ring off, then made this hole w dremmel
IMG_1516.JPG

added check ball and speedo drive gear
IMG_1519.JPG


@410Fortune so you were putting a manual cable on your T case?? I'm just trying to get the shaft out of the case half so I can put the chain back on both sprockets. I'll try to find some materials tonight to build a puller with. I don't think a regular pulley puller will get it off.

Is that ball just a keyway of sorts? Or does it do something else?


Do I even need the speed sensor on this T case in a 99 with a speed sensor on the rear axle?? Since I’m going manual shift, the t case shouldn’t have to be tied into the electronics, should it? I’m not using a 4x4CM, so…?? I should be able to just cut this ring off and move forward with my project?


no sorry i was not trying to confuse you...
i remember i dealt with one of those tone rings years ago I was hoping to find how i removed it.... but after finding my old pictures it looks like I actually cut it off
i was running a 96 explorer back then with a speed sensor in the back of the transfer case, so i was adding a speed sensor drive wheel to my 4406 t case
Now I just use the dakota box and take control of the speed sensor signal


But since my Speedo is driven off the transmission (or rear end?) I don’t need one in the t case. I’m just afraid I’ll get a CEL different speeds between the rear and the transmission?


Last nights progress. I was too tired to post before bed.

IMG_5535.jpeg

IMG_5536.jpeg


Here’s a photo dump for anyone searching for pics of the guts of a bw4406. The red stuff is the Loctite product in the pic.

IMG_5537.jpeg

IMG_5538.jpeg

IMG_5539.jpeg

IMG_5540.jpeg

IMG_5541.jpeg

IMG_5542.jpeg

IMG_5543.jpeg

IMG_5544.jpeg

IMG_5545.jpeg

IMG_5546.jpeg

IMG_5547.jpeg

IMG_5548.jpeg
IMG_5549.jpeg


IMG_5550.jpeg


And the only thing I did to it over the weekend was replace the injector connectors.

IMG_5551.jpeg


I use a poly mount made for an aod/f150 and modify the crossmember to accept it
Something like this one?
IMG_5553.jpg


Im dropping the pack in the frame, but I didn’t use my waiting time to order anything. For now I’m gonna have to put the explorer mount back in it. I can put a new mount in when I do my front diff later.


More like this
4.1142-360-giant-01-35.jpg


the rear drive shaft I pulled in the JY is 2-3” to long. 😡

But here’s the progress I made before finding that.

IMG_5554.jpeg

IMG_5555.jpeg

IMG_5556.jpeg


Here’s the difference between the v6 and the v8 cooler for anyone looking or interested. It’s really good to have a complete donor vehicle for this swap!

IMG_5557.jpeg


IMG_5558.jpeg


Loads of clearance between the t case and the fuel tank.

IMG_5559.jpeg


IMG_5560.jpeg


I went ahead and put it down with the better of the two explorer mounts I had. Had to drill new holes to move it over of course. I’ll look into the poly mount in the future. I don’t expect this one to last long.

IMG_5561.jpeg

IMG_5562.jpeg


wowee wow wow great pics
Looks like you moved the t case over full 1/2" or so
Driveshaft is pretty easy to shorten, not so easy to lengthen

Here is the difference between a 96 4r70w and a 99-01 wiring wise
We often upgrade the old 96 4r70w to use the 99-01 style internal solenoids and wiring, when we do I have to move some wires around at the white plug. Basically the 96 has 3 separate power feeds whereas the 99-01 has one and it splits into 3 inside the trans

4r70w pinout.jpg


I had to do all that wiring stuff with the Bronco's transmission. I can't remember if I redid the transmission plug or if I put the late model stuff in the transmission and had to adjust. It's been nearly 10 years and I've built or modified WAY too many other projects since then. But I DO plan on dropping the pan on the bronco and checking that 1-2 bore to see if it needs that kit I put in this transmission. It's never shifted 1-2 right. Always hangs for a while before it actually goes to 2. Gets old trying to ease around town and such.

I just talked to a shop that said he'd do the shaft for 150. Not sure I can't buy one off Ebay for less and have it here in the same time frame. Still a couple more places to call.


What U joints am I looking for for the rear expedition shaft? 1330?

there's a guy on Ebay that builds shafts cheap. I've bought a couple from him over the years. Thinking of having a whole shaft built minus slip yoke.


Well I was looking for pics of how the ps pressure line should be routed. But I found the bracket that clamps it to the ac compressor. But after fidgeting with it way too long, I ended up with this.

IMG_5580.jpeg


The ps pump is now rebuilt. And if you look close you’ll see the trans cooler lines will be replaced with rubber. I have a filter to put in line to it anyway.

image.jpg


Can someone confirm this is how the AC line gets tied down?

IMG_5581.jpeg


This is an 83 f150/AOD mount.

IMG_5582.jpeg
I’m not taking the time to order a poly mount, if this is what it looks like. That explorer mount was in decent shape. I know it’s not meant to handle the weight, it’s gonna have to work.


IMG_5583.jpeg


IMG_5584.jpeg


IMG_5585.jpeg


At least I’ll take the chance to correct the angle the mount was sitting at with where I drilled the holes the other day…


Power steering line correct
Ac line at alternator correct
The explorer trans mount will work but it won’t last very long the 4406 is heavy!
Looks like you have to modify the crossmember perhaps modify it to use the better f150 mount?
I have some pics of how I modify them to run the poly mount if you want to see

Doing a great job!!


Join the Elite Explorers for $20 each year.
Elite Explorer members see no advertisements, no banner ads, no double underlined links,.
Add an avatar, upload photo attachments, and more!
.


Spent a few hours at the JY on half-off day. I got the following g parts:

4 wheels and tires, 2 hub caps
Front diff, axles, and 4wd knuckles
5.0l Throttle body, bracket and plastic cover

By the website, it was $436 worth. But by the receipt he gave me, I bought a rear axle without brakes and 4 wheels/tires and it was a total of about $178.

The sad part is a lot of the price I paid was shown as core charge. This salvage yard is owned by the biggest recycling facility in town. So if they can’t crush a hatch that would get 1.50 in scrap price, the customer is going to pay them $10. Seems like a four letter word that starts with R. Which is exactly why I do go to this particular yard very often. What’s the justification for a $10 core charge on a steering knuckle? Yet that’s QSL hat they price list shows.

Any how. A decent day!

IMG_5634.jpeg

IMG_5593.jpeg


Back
Top