How to: - Rebuild 4X4 Shift Motor | Page 28 | Ford Explorer Forums - Serious Explorations

  • Register Today It's free!

How to: Rebuild 4X4 Shift Motor

Prefix for threads which are instructional.
Thanks for the post!!! thanks to this post i was able to get my 4WD working!!!

i opened the shift motor and lo, the bushing was crumbled like some fine cheese.
put some 1/4 in rubber/plastic hose from ACE hardware over it slapped it all back together, and BAM 4wd


Join the Elite Explorers for $20 each year.
Elite Explorer members see no advertisements, no banner ads, no double underlined links,.
Add an avatar, upload photo attachments, and more!
.


Old thread - but extremely helpful! Small contribution: The commutator is the part of the armature that the brushes ride on. A cleaned commutator will quickly pick up brush material and become discolored. That's not a bad thing, in fact the brush material is blended to include graphite for lubrication. The spaces (slots) between the commutator bars are more of a problem because the brush material can build up and short the bars together. At some point the armature will produce less torque and eventually fails. Cleaning the slots is probably more important than cleaning the bars. And, as mentioned earlier, don't allow grease or dirt to get on the commutator when putting the motor back together.


It's so wonderful to hear that ka-chunk ka-chunk and see the instrument panel light up "4X4", especially when its snowing like crazy!

Good tip on the commutator, Larry. When I repaired my starter motor, I cleaned the commutator with QD electrical contact cleaner and scraped out the carbon from the slots between the commutator bars with an X-acto knife.

Bob


Thanks!

Thanks again Brain! Your how to post is excellent, when I pushed the 4x4 button on my truck the 4x4 lights would light up but 4x4 was not working! strange huh? well I removed the 4x4 motor removed the lid and removed the round gear and there it was right in front of my eyes, the rubber bushing was in pieces and some of them just so happened to be jammed in the gears so I removed the broken bushing, detoxed the electrical terminals and traces and replaced the broken bushing with rubber hose from one of those marine outdrive lube pump hoses found at Walmart, I already had one and it looked perfect size and all so I just cut a little piece from it and it worked great! 4x4 is now working again, I may need to clean the grease out of my hubs a little but other than that it is a go. If I wouldn't have read your thread I wouldn't have known about that little booger! Thanks a ton man great thread!:)


Also I would like to add that the 4x4 motor shaft barely moved at all it just vibrated back and forth a bit while my daughter was pushing the button I was watching the shaft on the motor, I wonder why the 4x4 lights came on the dash at all? I thought the position sensor in the motor knew where it was at all times:confused:


Hi peeps thanks for the great post, was directed to it from our local 4x4 forum in South Africa.

Here is my problem. Bought my 2005 Ranger beast a year ago and sued the salesman to replace the gearbox since it was switching like a kicking mule. Never tested the 4x4 and had problems with that ever since they replaced the box. Could switch to 4x4 or so the truck told me but no 4x4 action. Found the front drive shaft cv shot and had it rebuild. Ever since I had the issue of no 4x4 and hublock light permanently flashing. After getting to this forum today I jumped back into the truck. Disconnected the power to the hublock vacume solenoid and manualy disconnected the hublock. Then ripped out the shift motor and low and behold it was rusted stuck. Rebuild it and refitted it. The motor with shift assembly works fine of the car when power applied in my workshop but on the car no go. I hear the relays switching in the truck. I think my motor is an after market as it does not look like the first postings on this forum. Especially the disc that the 6 fingers move on. Mine got way more tracks but also the fingers don't look so good any more. I have a suspicion this is the problem but is there a way to test it before I go grab a whole new motor. Any voltages I could check on the plug. (7 wires into the plug including the orange and yellow power to the motor.

Thanks


If you replaced the broken stop bumper (or just simply removed the geared selector shaft) within the shift motor and you're still getting "clicking" noises from the 4x4 computer in the trunk area it indicates an electrical problem. Most often the issue is that the Shift motor was not installed in EXACT position it was in. Often it's because the selector was installed slightly behind 2H. When this occurs the 4x4 computer is blind and doesn't know the position of the T-case selector shaft and will NOT shift the T-Case.

Try re-synching the shift motor.

To re-synch the shift motor:
Remove the shift motor and use pliers to manually turn the T-case selector shaft to 4H. Reinstall the shift motor case and geared sensor (the long bolts won't initially align). Turn the shift motor so the bolts align and bolt it down to the T-Case. When you turn the truck on the 4x4 system will see the position somewhere in between 2H and 4H. When you press 4x4 it will move to the correct position.


Thanks a mill DeRocha. Will try that tomorrow as it is now dark over here. Lol will try anything rather than to spend lots on new one. I am fearing the worst as the little disk and wipers did not look to good, lets hope the old compy get the right signal. But as a previous poster mentioned, if it aint born it can be fixed and now a days we even fix the born ones. Once again peeps awsum forum I salute you all


Just a foot note DaRocha. What you say can make sense. As I mentioned this might be an after market. I don't have the plastic stopper. On the gear it has a metal pin and the actual body is made out of plastic inside which has a raised plastic piece that stops the gear....this was badly worn. If I have to strip it again I will take pics and post


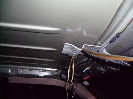
Well, I spoke too soon in my recent post. Word to the wise: Test your shift motor every couple of months. Don't forget about it until it starts snowing. We are getting snow, and sure enough, mine isn't working anymore:(. It was intermittent, so I thought I would shift in and out of 4WD to exercise it an maybe wipe the position sensor contacts clean. It cycled a couple of times and then stopped working:roll:. I don't even hear relays clicking in the computer. The fuse is OK. When I press the button on the shift computer the LED lights for about 40 seconds and then goes out. I don't remember what that means, but I think it did that when I last repaired the shifter.

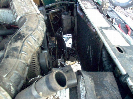
I replaced the plastic bushing years ago with a piece of rubber fuel line, but I suspect that now the rubber has deteriorated. When I did the first repair, I made a diagram of how the position sensor contacts work, so I can do a continuity test.

Right now I have the shift motor on the bench and the shaft position looks a little off, from the 2WD arrow I marked when I first repaired it, so I think (hope) that the rubber stop is the problem. Unfortunately, I can't get the cover off to have a look inside. Those 3 security torx screws are stuck. Even after spraying with penetrating oil, I broke the torx bit, and I thought that the last time I fixed it I used zinc grease on the threads. I'll keep spraying the screws every day, until I can get a new torx bit (20T security bit), but I may have to do the unpleasant task of drilling out the 3 screws. I'm thinking of drilling out the pins in the center of the torx screws so that I can use a conventional torx driver, which may be stronger, but that, too would be a pain. I'm thinking maybe heating the casting around each screw with a soldering gun might break them loose.

Ideas and sympathy greatly appreciated. Man, I'm almost ready to convert to a manual transfer case!

Bwana Bob


Bob, if you haven't done something else to solve the problem by now, I'd try gently heating (I use a heat gun) the area and gently tapping on the head of the bolts. I've used this trick for years to loosen small bolts and screws that are frozen into pot metal or aluminum when spray-on penetrating oil doesn't work. I used to be in marine service and it saved having to replace a lot of parts.
Larry - KC7JJ


Thanks, Larry.

I'm thinking the same thing. I can borrow a heat gun from the workplace.

Another trick I've used to solder the bodies of PL-259 connectors is to remove the tip from a soldering gun and press the two gun electrodes against the part so that the soldering gun current flows through it and heats the metal part. I'm going to give that a try to see if that makes enough heat around the screws. I've been spraying the screws with penetrating oil every day or two, until I get the time (after Christmas) to buy a high strength Torx bit, since I breke the one I had.

Thanks again,

73,

Bob WB2VUF


If worse comes to worse.

I've worked on a few shift motors were the heads of the torx bolts were fubar'd pretty bad. I ended up taking an angle grinder and removed the heads so the cover could be removed. The remainder of the threaded bolts stuck up 1/2" from the case and I used vice grips to unscrew them.


Heat and tapping

I've used larrydd's fix just above many times, it really has saved me some serious grief. Somehow the heat expanding the parts, tapping to loosen the connection in the corroded metal, and a good connection with the tool, i.e making sure the bolt head is very clean, tool is a quality one with a good fit; works better than my old school, bang the heck out of it and get frustrated, method !!


Thanks, guys,

I will definitely try heating the gear case around the screws.

My problem right now is that I broke my torx bit and have to find another. Sears and Ace Hardware either have the weak bit or complete sets, which I don't need. I'll try the auto parts stores. If not, there are a couple of mail order places:

http://www.wihatools.com/700seri/701serie.htm
http://www.mcmaster.com/#7377a46/=py7ebt

Does anyone know the test procedure for the shift motor controller? There is a momentary switch on the module. When I press the switch, a red LED lights for about 40 seconds and then goes out. I don't remember if that means "Go" or "No Go".

Bob


I'm going to add to this thread right now since I just pulled the electric shift motor off a BW1354. It may have been added in the past 4,524 pages of this thread :) but anyway:

1. In the original post, the poster removed the entire t-case. That's fine, but that is not an option for some if on the trail, etc. Therefore, I'll serve notice right now that on a 94 Ford explorer, with the electric BW1354, you will have to CUT one wire to remove the shift motor assembly. In the OP, this wire is shown UNCUT because the original poster pulled the entire transfer case.

The VSS wires (green and white on my truck), you can simply unplug. But there is a third wire, which is a singular wire, that goes into the axle housing. It has no plug or fitting. It must be cut and capped, to the best of my knowledge. If anyone has a better idea, let me know. Also, if anyone knows what that wire is, I'd also like to know that.


Rhett: Yes there is no need to removed the T-case to work on the shift motor. The Brown wire you are describing is used to energize the electro magnetic clutch within the T-Case (which activates the front drive shaft). Common wires are listed below along with a image of the shift motor and T-case for reference.

On post #24 it is mentioned you can remove the brown wire from the wire connector by prying out the red retention fitting. I've tried to do this myself but couldn't seem to dig it out and I just cut the wire and soldered in quick disconnect terminals that I used shrink tubing on.

Shift motor: Orange and Yellow wires
Speed Sensor: Light Green and Light Blue wires.
Electronic Clutch: Brown wire

The other wires are part of the Geared T-Case sensor.

27133Tcase20B.jpg


Thanks Derocha and good to talk to you again. The truck has served me well thru 14 years of my ownership, and has 170,000 miles on it.

Rather than do a manual t-case swap, I am going to install a Shiftster soon, to simplify the whole thing. On my truck the wires were so dirty that I had trouble making out the colors of the wires, but I may clean up the shift motor now, and take it apart. You never know, I may want to go back to the electrically operated t-case in the future. But I doubt it.


Rhett,

I hadn't heard of the shiftster, so I checked it out. Looks like a great idea. Not convenient to operate, but neither is having the 4WD shift motor fail the night before the big snow! The price is reasonable, just to have one in the spares kit.

The brown wire in the center of the connector is removable, but it requires a couple of tricks. First, use a straightened paper clip with a small right-angle bend at the end to pick out the red insert in the center of the connector. Then use a small screwdriver or pick to gently pry back the locking finger and pull out the brown wire from the rear.

My shift motor has been sitting on the bench for a couple of weeks. I had to order a new Torx bit from NAPA, because I broke both of the cheap ones I had. I've been spraying the shift motor gear housing cover screws with penetrating oil every couple of days and I borrowed a heat gun from the workplace, so I'll tackle it this weekend.

Bob


Join the Elite Explorers for $20 each year.
Elite Explorer members see no advertisements, no banner ads, no double underlined links,.
Add an avatar, upload photo attachments, and more!
.


Rhett,

I hadn't heard of the shiftster, so I checked it out. Looks like a great idea. Not convenient to operate, but neither is having the 4WD shift motor fail the night before the big snow!

Yes, for $60 I figure if I don't like the Shiftster I can rebuild my shift motor and put it back in. I'll post up something when I get it installed...which may be a while because they make Shiftsters in batches...I may have to wait for mine.

Thanks for the tip about the brown wire.


Back
Top