What did you do to your 5th Gen? | Page 117 | Ford Explorer Forums - Serious Explorations

  • Register Today It's free!

What did you do to your 5th Gen?

I just installed new Powerstop brakes. Bought the Explorer in 2019 and never touched the brakes. I noticed the rotors were warping when braking at highway speeds so I decided to replace everything. The new "Evolution" carbon pads had some weird metal clips that I had to break off but otherwise smooth install.


Join the Elite Explorers for $20 each year.
Elite Explorer members see no advertisements, no banner ads, no double underlined links,.
Add an avatar, upload photo attachments, and more!
.


@mguy13sport looks great!

I did PowerStop last year and they’ve held up great.

I had some issues with clips too IIRC. I had to use some older ones.


Changed the spark plugs today with NGK Iridium IX 6509's. First three were very easy, back 3 I used YouTube to tell me how to take the intake off, etc. Not too hard, but just takes a little time. I have to admit, there is a small bolt under the throttlebody that holds the intake on. I overtightened it and broke the bolt head off. Guess I worry about that next time I'm in there since I didn't have more time to futz with that. Truck has 95700 miles on it and this was the first change. Still had Ford Motorcraft in it since I bought the car new in March 2017.

IMG20220530153352.jpg IMG20220530161834.jpg IMG20220530161836.jpg IMG20220530161901.jpg IMG20220530173952.jpg


I’d be interested in hearing more about retrofitting sync connect. I have a 2017 XLT that I want to retrofit. Did you have factory mount location for the TCU? Were the wiring harnesses there? Did you have to order or make any additional harnesses?
The only Explorer's with a harness are those that came from the factory with Sync Connect, you'll need to make a harness. The factory mount location can't be used on 2016/2017 models due to differences in the plastic interior panels.


Recently, I picked up my Explorer from having the water pump and the rear A/C components replaced (all covered under my extended warranty).
cco43eZ.jpg


Since then… I‘ve gotten the front door windows tinted to match the rear factory privacy glass
IFQbaNj.jpg


I added OEM hood lettering in Magnetic (matches the color of my previous car that was traded in for this Explorer)
RpGJxCn.jpg


dYLYF57.jpg


I updated my Sync infotainment to v3.4 software and the most current maps
AB6qVMm.jpg


And I added some decals to the rear window to help customize it to my taste
REWUDBY.jpg


Here are my two current vehicles together…
AVecaVG.jpg


Got my 3.5L N/A Explorer tuned by Torrie at Unleashed. It’s definitely quicker and more responsive.


Put a new battery in my Explorer and read about the BMS reset that must be performed afterwards, I found this procedure on Mustang and F150 owner’s forums and just confirmed that it worked on the Explorer too.

Procedure must be carried out within 10 seconds:
  1. Switch ignition on (engine off)
  2. Pull and release high beam 5 times.
  3. Press and release brake pedal 3 times.
  4. If successful, the battery light will flash 3 times within the next 15 seconds
  5. BMS reset completed.


Ok so finally did alot of stuff I've been wanting to do, since we had a week off for Fall Break. I already had done the rear shocks in the summer, but had more to do now. I bought Bilstein's for the rear, but will wait to install those, because I put in KYB in the summer since Bilstein's were on backorder. So keeping those on the shelf for later.
(KYB Shocks & Struts Excel-G Rear FORD 2017-2013 FORD Explorer - 3440040 × 2)

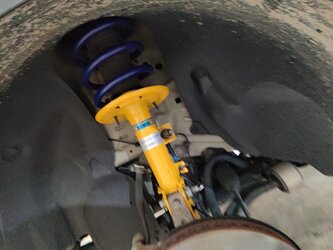
This week I installed the H&R lowering springs in the rear (pretty easy), and replaced the front struts with Bilstein B6's and new lowering springs. More on that later.
H&R 11-19 Ford Explorer (2WD/4WD) 4 Cyl/V6 Sport Spring - 51630 × 1
Bilstein B6 11-17 Ford Explorer Front Right Twintube Strut Assembly - 22-266620 × 1
Bilstein B6 11-17 Ford Explorer Front Left Twintube Strut Assembly - 22-266637 × 1

I also installed the z36 powerstop brake pads and drilled and slotted rotors. Also painted the calipers red. Didn't try to make them perfect, but they look nice. I bought two cans, but only needed 1 FYI. The brakes and rotors look great and feel great.
Power Stop Front and Rear Z36 Truck & Tow Brake Pad and Rotor Kit K6375-36 Fits 2017 Ford Explorer
VHT SP731 Real Red Brake Caliper Paint Can - 11 oz.

So..... all the drama for me came once I got it all together and went for first test drive. Had major clunking in the front even over small bumps in the road. I didn't have any nice tools to get down in the top hat where the nut on top of the strut is. Everywhere I looked said that if you use an impact and buzz it a few times, then that's enough. HELL NO. I was a bit scared of using the "widow maker" compression brackets for the springs, but after doing this so many times now, I'm not afraid of them lol.

Like I said I have no 22mm (stock was a 21mm nut, but new bilsteins used 22mm) passthrough socket but wish I did. So, on the second try and lots of pain as I'm out of shape and almost 47 years old lol, I decided to compress the springs more than I did before and use vice grips to hold the piston while I tightened it with my impact gun. DON'T FREAK OUT! I know that you aren't supposed to do that, but this was a last resort. SO, I put a microfiber towel on the piston right where the vice grip jaws went, and it didn't scratch them at all. Got everything back together, and then went for the second test drive. STILL SOME CLUNKING but less this time.

Now I'm getting a bit tired and defeated. I figured one more time before having my friend come over to help who is better with cars than me. I took everything back out (struts) and REALLY compressed the springs, and made sure that it was tightened down as far as it could go. Got everything back in and went for the third test drive. Prayed hard just before taking off lol, and finally it's tight and feels great!

I'm typing all this up, so the next person knows to REALLY tighten everything down on the top of the strut, especially when putting in lowering springs. The rod coming out the top is seriously about 3-4 inches high. lol


Also picked up some 22inch Ford Flex rims, and can't wait to clean them up, and get tires for them. Not sure if I have the room after lowering the truck though! lol

Happy modding!

Travis

truck2.jpeg rims.jpeg brakes.jpeg truck1.jpeg struts.jpeg


How do you like it? I’m doing downpipes this weekend. Thinking about getting an axle back as i have a piu but i’m not sure yet.
Sorry for late reply...i love it thanks...what downpipes did you end up going with?


I know this is a really old thread, but the installer missed installing the aluminum backing plates for the bushings on the sway bar.
Just FYI, the member you quoted was last seen here on January 16, 2021. ;)

Peter


Are you sure the front calipers are working? The fronts should wear faster than the rears. If the rotors are rusty, the pads might not be contacting them.
My rears (pads and rotors) went out (38K MI.) before the Front. I'm guessing the non vented and abs for snow and slowing inside wheel down in corners killed them.

I'll try and find the pics for the rears I ended up doing the fronts a few weeks ago at 49K MI.


I’ve added masts and sails to improve my X’s gas milage and add some more torque. Also changed the odometer to nautical miles and changed the mph into knots.

B5ECD005-764D-42A0-BBF9-66AE2961C29C.jpg
I bet the stopping distance is greatly reduced when throwing the anchor out the back.


Did new rear Ac line, flexible one, while doing it, I removed the motor cover...
Luckily it was isolation wool they used, but had a nasty nest under there!
Photo 1
Photo 2
I'd suggest looking once a year if any critters want to share a ride under there, so they don't!


Did new rear Ac line, flexible one, while doing it, I removed the motor cover...
Luckily it was isolation wool they used, but had a nasty nest under there!
Photo 1
Photo 2
I'd suggest looking once a year if any critters want to share a ride under there, so they don't!
Keep the cover off. Its retaining heat and only purpose is to suppress engine noise. Same with the foam fuel pump cover.


Join the Elite Explorers for $20 each year.
Elite Explorer members see no advertisements, no banner ads, no double underlined links,.
Add an avatar, upload photo attachments, and more!
.


Coming back from visiting family, my dash suddenly popped up, problem with charging system. I was on toll road, with the whole family in the car. Hoping i would make it home, i stayed a steady 85 mph. Gradually, things started shutting down, first stereo, then gauges, and finally the engine. Granted it is Sunday afternoon, holiday weekend. I found a wrecker that would tow to my house(12 miles away). I thought for sure i would be gouged, but the guy was independent and didn’t take advantage of me. I knew it was alternator and ordered one from Advance Auto for 428.00 and was in stock at my local store.
If you haven’t changed an alternator on these transverse engines, prepare for a treat. I watched YouTube videos to get an idea. Front wheel comes off, plastic wheel well liner comes off. You can get to the belt, tensioner and remove the alternator bolts from there. You must get the radiator fans out of the way to remove alternator and install replacement. Overall, was not to terribly bad. I am 68 and total job took me about 6 hrs. I worked in the mornings for a couple hrs at a time. I could do it in less time now since i now know the things I did that wasn’t necessary. By the way, this was Easter Sunday when it happened. Just late in posting.


Back
Top