RockRangerII the build up. | Page 2 | Ford Explorer Forums - Serious Explorations

  • Register Today It's free!

RockRangerII the build up.

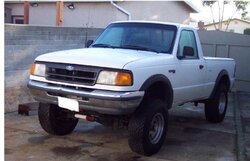
After loosing my last ranger a bit over a year ago I finally got onther one to replace it. The truck I am starting with is a 1993 ranger 4X4 xl standard cab short bed. It is pretty much a bare bones truck. No AC no cruise and a manualt t case. It also has a 4.0 and a 5 speed with 3.73 and an open rear diff. When I purchased the truck it came with a 2.5" rancho lift 31" bfg AT tires on aluminum rims.

I have had the truck around 3 months now and have put about 3000 miles on it sofar. Over that time I have noticed a few things about it. When they installed the lift instead of installing longer brake lines they installed limit straps that limit down travel to about 1" from ride height and also removed the sway bar. They also didnt lift the rear at all and it has a serous case of butt dragging.
 

Attachments

  • ranger.jpg
    ranger.jpg
    39.5 KB · Views: 3,926


Join the Elite Explorers for $20 each year.
Elite Explorer members see no advertisements, no banner ads, no double underlined links,.
Add an avatar, upload photo attachments, and more!
.


Fenderguy said:
I know whatever you do will look funky but good at the same time :p and still be very functional. Pics are always good. Hey did you ever get the Truck Haven pics off your camera?

I am trying to make things look a bit more appealing but am not being to succesful so far. Need alot more practice but I keep trying

I got the pics of the camera but each picture is over a 1mg so I still need to try to resize them. I think I figured out how to just takes along time doing them in photo draw.


Join the Elite Explorers for $20 each year.
Elite Explorer members see no advertisements, no banner ads, no double underlined links,.
Add an avatar, upload photo attachments, and more!
.


Fenderguy said:
Alright Matt, I finished it for you except for the SAS. I'm sure you'll recognize the bumper too. :D

LOL classic picture I like it. Bumper will be much different this time.


Savage Wolf said:
Hmm the way you did your lincoln locking you might be kicking yourself later for, did you just fill some of the teeth on the spiders cause in the pic it looks like the spider is welded to the carrier (bad) if i remember right that means the C-Clips are welded in now? other then that it looks good =)
Oh and the front D44 are the rotors 6 lug? i didnt see any spindle/rotor/hub in the pic

The c clips ride on the inner part of the spyder gear. I welded on the out side part in addition to doing the gears to each other as well. It should work the same just pull the 5/16 bolt, knock the cross shaft out and pull the c clips. I am sure I will be finding out if it works when I do a ratio swap in the future. If I cant get it apart Ill cutit apart and get a new carrier try again :D

For the axle I stripped the knucles hubs roters and axle shafts and put them in the corner of the shed I work out of. I was trying to lightened the axle so it would be easier for me to move around bymyself.


Here are a few pictures of the diff guard mounted up.
 

Attachments

  • diffguard1.jpg
    diffguard1.jpg
    31.6 KB · Views: 1,608
  • diffguard2.jpg
    diffguard2.jpg
    33.7 KB · Views: 1,614
  • diffguard3.jpg
    diffguard3.jpg
    82.9 KB · Views: 1,614


hey matt, glad to see you will be up and wheeling again... that ranger looks loads better than your old one :)


Here is a picture of the start of the rear bumper it a 2x4 tubing 1/4" thick. More will be added to it eventually. the corners will also be cut at an angle on the bottoms similar to db1 rear bumper.
 

Attachments

  • rearbumper1.jpg
    rearbumper1.jpg
    35.8 KB · Views: 1,585


Once i was able to get it bolted up into the place that I wanted it I could start on the rest of the bumper. It took me 2 hours to get the bolts cause I drove to fastenal, got to the front door and relized i forgot my wallet. Once the bumper was up I could attack the next problem area
 

Attachments

  • rearquarter1.jpg
    rearquarter1.jpg
    27 KB · Views: 1,586


Great work thus far. You could probably make some money selling those diff guards to the TTBers.


After some carefull measuring I figured out just how much would need to be trimmed.

The inner supports will be cut out as well except I couldn't get my 4.5" grinder in there to cut them. Ill have to get a 7" wheel and put it on the grinder so I finish hacking it out the rest of the way. I will eventually be tieing a 2x2 .250 wall tube from the rear bumper to wheelwell then have the front braced back to the frame. I did relize that the way I was thing of mounting will not work. If I weld a support from the edge of the wheel well strait back to the frame to a plate bolted on I wont be able to unbolt the bumper from the frame without eather removing the bed or unbolting the shackles. I think I may have to add some coupling deals like people to for the suspension tower that goes over the top of the motor.
 

Attachments

  • rearquarter2.jpg
    rearquarter2.jpg
    21.1 KB · Views: 1,592


Trckmagik said:
Great work thus far. You could probably make some money selling those diff guards to the TTBers.

I have thought about it but right now it takes to long to cut each piece with a 4.5" hand grinder. If I had a torch or a plasma that could speed it up then I would do it. Might get one of those in a few months i hope. I also need to improve my welding skills as well

Here is my wonderful "shop" area. It is maybe 9 feet deep and about 12 feet wide. crammed in there is a work bench welder air compressor tool box drill press parts washer band saw storage rack and all the other usual car crap needed. There is about 15 feet in front of my area but it is filled with my moms and grandmas crap. I am trying to move some of it out to make more room so I dont have to move 5 things to get to one thing. Sure glad I live in san diego where I can work outside year round. It was in the upper 70s today :D
 

Attachments

  • shop.jpg
    shop.jpg
    45.9 KB · Views: 1,842


Matt, this kicks ass.....

Get yourself some of those smooth headed bolts for that diff guard :)
Looks great so far.
This Ranger is sitting there, going out to the desert, looking at your compadre's rigs and going "ut oh, who's this guy that bought me" and feeling a little "un-easy" MUAHAHAHA

This may be the fastest Buy truck to rock rig buildup in history, I say get it over with and chop the doors !!!!


I thought about using a carage bolt for it but was concerned about the strength of a non grade 5 or 8 bolt on there. Im not sure how much the bolts will hit as they are not the lowest point on the diff. They are about an inch higher then the bottom when measured vertically. I dont know if this will be the fastest. I would like to have it fully built by next january but we will see what happens. I am going out of town tommorow and be gone for about a week or so the progress will stop where it sits. Wont be taking it for a drive yet to test out the new locker.


Lookin good so far Matt :thumbsup: That diff guard came out pretty cool too.
When I bobbed my bed it was pretty banged up so it was hard to get things to line up so i'd say if your gonna do it, the sooner the better.


I have a diff guard for my ttb that is almost identical to that one. Mine has a little bit more coverage on the front and back though. Works great.
Hope your project goes according to plan. That is gonna look pretty killer.
Around here, I almost never see rangers like that (xl, v6, 5sp, 3.73)


I just got back into town 2 days ago. Yesterday I finished up the rear bumper. I decided not to wrap it around the sides right now cause I want to focus on other areas first. I forgot my camera up at my girlfriends house in fresno so i dont have anyway to post pictures. I have also spent a few days working on some different drivetrain ideas. I think they might work but it is still a few months away before I will know forsure. I am modifying rangerX front diff cover probably today and if i can get the motivation I might start on the sliders.


I built a diff gaurd like that and sold it when I did the SAS. Didn't really come out on top since I spent6 a huge amount of time making it (No plasma cutter here either). Nice project. You need to cut out the ole half doors on this one too, though!


didnt do to much work on the ranger today. I mounted the rear bumper and then modified rangerX diff plate. Then I wired cable tv into the shed and then the TV dies


Join the Elite Explorers for $20 each year.
Elite Explorer members see no advertisements, no banner ads, no double underlined links,.
Add an avatar, upload photo attachments, and more!
.


didnt do to much work on the ranger today. I mounted the rear bumper and then modified rangerX diff plate. Then I wired cable tv into the shed and then the TV dies after having on for about 3 minutes. Might start the sliders tommorow but I need more steel for makiing the mounting plates for the frame side.


Back
Top