Completed Project - Brandon's mild 4.0 OHV build | Page 10 | Ford Explorer Forums - Serious Explorations

  • Register Today It's free!

Completed Project Brandon's mild 4.0 OHV build

Use this prefix for completed projects that are not "How to" articles or threads asking for help.
So, as of 5 hours ago Ronin8002, or James' built OHV block became mine; and with the stea.. I mean deal I got and all the extra goodies he threw in, he seemed a little too happy to get rid of this thing :shifty_ey... lol! But WOW this thing is in good shape! As a christmas gift from my parents, I've been given the opportunity to really dig into an engine like I've always wanted to do. I've watched and assisted a couple chevy 350 builds over the past few months but have never done anything by myself.. so here goes nothin!

The Meat (James' Block):
- 1995 block bored .030 over and torque honed
- Keith Black Hypereutectic 1995 Style Pistons (staying around 9:1)
- Total Seal piston rings
- Clevite bearings
- Stock Water pump/timing cover (awesome shape!)
- Stock Fuel Rail
- SOHC Oil pump/pan - to strengthen up the bottom end
-- Possible port/polish on the lower intake, we'll see when I get there

The Goodies:
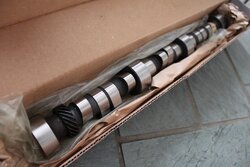
- Comp Cams 49-422-8 Cam
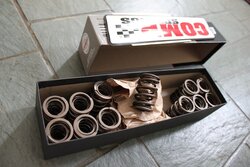
- Comp Cams 988-12 dual valve springs
- 95tm heads with minor porting/polishing

(on the way, supposedly 11/28/10)
- SI sev2027 and sev2028 valves
- Delta Cam rockers
and pushrods will come later down the road when properly measured

I'm going to keep a diary as things progress on the motor, once I get all the parts in it really should start coming together quickly. I'm down for any type of constructive criticism you have, if you don't like the way I'm doing something PLEASE let me know, as this will be my true first solo go at an engine! JD4242 has really given me a lot of direction when it comes to the 4.0, by reading through his posts in the forums I'm still baffled by the amount of knowledge he has of these things. So, many thanks to you JD!

First order of business, I need help tracking down a full gasket kit, reasonably priced as the budget is dwindling down, I hear an ebay seller has them for around $130??, as well as new head stud/bolts. I'm not feeling ARP's $400 set of head bolts/studs. Does anyone have any suggestions or leads on either?

Thanks for lookin! Here's a couple of teaser pics! Pics of the motor when I get it all unpackaged and on a stand.

-Brandon
 

Attachments

  • IMG_0007.JPG
    IMG_0007.JPG
    91.8 KB · Views: 6,273
  • IMG_0009.JPG
    IMG_0009.JPG
    76.1 KB · Views: 6,675


Join the Elite Explorers for $20 each year.
Elite Explorer members see no advertisements, no banner ads, no double underlined links,.
Add an avatar, upload photo attachments, and more!
.


Damn crack!! You get anything hunting? You got that motor pulled out yet?


Join the Elite Explorers for $20 each year.
Elite Explorer members see no advertisements, no banner ads, no double underlined links,.
Add an avatar, upload photo attachments, and more!
.


Yeah, bagged me a 195lb doe at 347yds :shoot: :D with a Remington Model R-25.. first season/kill I got to use her! I was so excited!

Supposedly they started on one of the heads, completed the valve/spring job and began to work on the other one when they noticed the crack.. ARGG!!

No the old block is STILL sitting in the truck.. maybe I can pull it out monday, as Mon - Fri are the only days I have access to the engine lift.

347 yards DAMN!!! my rearend went out in my truck last night so looks like ill be out next weekend trying to switch those out!!


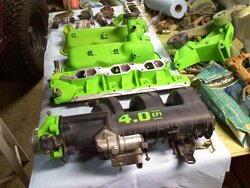
Got all my stuff painted tonight..

The machine shop still hasn't picked up a new head for me to replace the one they cracked.. yeah.. they cracked it. Just goes to show how much Porting/Polishing is going on!! :p:

Yes I realize the tensioner isn't painted.. that one has about 1/8th of play in it and the bearing sounds like a dying cow.. it's going to get replaced here soon.
 

Attachments

  • 0102011734.jpg
    0102011734.jpg
    115.3 KB · Views: 780
  • 0102012336.jpg
    0102012336.jpg
    143.4 KB · Views: 788
  • 0102012336a.jpg
    0102012336a.jpg
    147.3 KB · Views: 758


How did they crack it?? Also you didnt have atleast that lower intake gasket matched and p+p?


To be honest with you, I don't exactly know what you mean by gasket matched, but it has been smoothed/polished and the humps near the bottom, just before it goes into the heads have been knocked out/smoothed. I left it up to them on the P+P..

My best guess is it was either mishandled or cracked during the heat bath/chemical treatment.. I'll find out tomorrow when I go see them.


Put your lower intake gasket up to it on the bottom and see how far off it is.he had to come through the sides on some of them to get them to flow and open up,last pic.these pics where before he was completely done
102mkon.jpg

2e2lb3k.jpg

fp6y2p.jpg


Ah, see that's what I was thinking.. just another case of R-tardeness..

The answer is yes, but no. Yes, but not nearly to the extent yours is. They are noticeably wider, especially on the intake-to-heads side, but you have to know what your looking at or seen them before.. mainly it was just smoothed down and widened closer to the injector hole.

Yours has a TON of work put into it.. especially if those are the pictures of it not even completed!!


Gotca


Brandon,
Lookin good! What paint did you use?


I tried a few techniques on the other set of valve covers I had.. but this one seemed to work the best:

- Cleaned/acetoned them and let them dry in front of a heater for 15mins
- Sprayed a light base of Dupli-Color's 500 degree Ceramic Primer then heat gunned it
- Sprayed another layer of Primer and then let sit near the heater for 15mins
- Sprayed a light coat of Dupli-Color's 500 degree Ceramic Mopar Green then heat gunned it
- Sprayed another layer of Mopar Green and then let it sit near the heater for 15mins
- Sprayed a light coat of Rustoleum's Fluorescent Yellow then heat gunned it
- Sprayed another light coat of Fluorescent Yellow then heat gunned it until I could handle them

I'm talkin LIGHT coats on each one, especially the Mopar Green

As I finished each layer on each part I let them sit in front of a propane heater, after I finished them with the yellow and they were drying I SWEAR every time I looked over they just kept getting brighter and brighter.. Can't wait to see what they look like today!


Rusto makes a high temp high gloss clear.i used it over everthing,protects the paint,makes it shine like crazy and anything that gets on it just washes right off.


Got mine at autozone.it really made a difference


Going to have to try painting some things using your technique Brandon-Looks great!


1. lookin good
2. prettyy
3. ouch.
4. OUCH!!!
:mad::frustrate:censored::splat::fire:

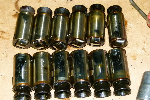
So how does one go about getting money out of a cracked head?
 

Attachments

  • IMG_1194.JPG
    IMG_1194.JPG
    52.6 KB · Views: 708
  • IMG_1197.JPG
    IMG_1197.JPG
    117.2 KB · Views: 709
  • IMG_1196.JPG
    IMG_1196.JPG
    139 KB · Views: 729
  • IMG_1195.JPG
    IMG_1195.JPG
    94 KB · Views: 754


Join the Elite Explorers for $20 each year.
Elite Explorer members see no advertisements, no banner ads, no double underlined links,.
Add an avatar, upload photo attachments, and more!
.


Back
Top