1997 Ford Explorer - V8 - 5.0 - AWD | Page 10 | Ford Explorer Forums

  • Register Today It's free!

1997 Ford Explorer - V8 - 5.0 - AWD

That's heavy duty there. Do you need a skid plate there too?

I could build something off the cross member but will have to set up suspension links first to figure mounting. Sky is the limit at this point.


Join the Elite Explorers for $20 each year or try it out for $5 a month.

Elite Explorer members see no advertisements, no banner ads, no double underlined links,.
Add an avatar, upload photo attachments, and more!
.


Spring mount tacked in place and frame notched for clearance:
index.php


Started mocking up the link suspension. I was going to countersink the mounts into the trans cross-member, but I may just weld them in place and gusset as needed to keep them more parallel to the ground. Let me know your thoughts, I'm open for discussion....A few photos a different angles for different visuals.

index.php


index.php


index.php


index.php


index.php


This view to show clearance to header pipe:
index.php
 

Attachments

  • full.jpg
    full.jpg
    226.4 KB · Views: 207


Looking good sir. I like how you have them set up.


Can anyone provide any recommendation for the steering rods? I'm thinking GM 1 ton tie rod ends or Heim Joints. I'm not particular in spending another $60-$100 for a reamer to make the 1-Ton conversion....but...I want to go with what's best.

Any input is appreciated.

@Turdle ; @Rick ; @CDW6212R ; @johnny499 ; @yostyexplorer94 ; @BKennedy ; @Styx


Project still on the go....Been a little distracted at home...hope to get more done this weekend - at least get the trailing arms mocked in placed to make ready to get panhard in place.


Can anyone provide any recommendation for the steering rods? I'm thinking GM 1 ton tie rod ends or Heim Joints. I'm not particular in spending another $60-$100 for a reamer to make the 1-Ton conversion....but...I want to go with what's best.

Any input is appreciated.

@Turdle ; @Rick ; @CDW6212R ; @johnny499 ; @yostyexplorer94 ; @BKennedy ; @Styx


I tried copying the desert guys and used heims. However, they are not the proper choice for moist conditions IMO, so, I would do the 1 ton ball joints which are a "wet" joint rather than he "dry" joint of a heim. heims get kinda squeeky and noisy when exposed to moisture
.


New Trans Crossmember fab'ed in to make room for front drive shaft. Cutting stock crossmember out once new mount is installed.

Credit for idea goes to @johnny499 - Thank you!

full.jpg

Do you have a full picture of the Trans mount?


@WormsExplorer - Ill take some and post them for you.

Thanks @Turdle for your feedback. That explanation helps me immensely


I really like my one ton tie rod ends. I have replaced 2 tie rod ends since I sas years ago. I grease them quite often though


@WormsExplorer

Sorry my friend...been crazy here at home.

I used @johnny499 idea to create mine (see page 3 about 1/2 way down - great photos): Mn Mountaineer V8 SAS


Im hoping to jump on this thing this weekend to get front panhard completed/mocked and hopefully the steering box in place. :)


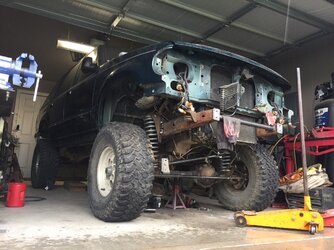
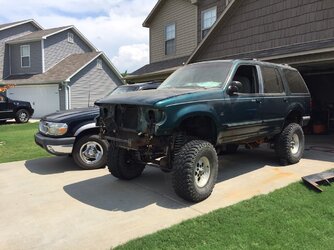
I made the time to work on my Explorer this weekend...Lets dive in.

2 things I needed to get accomplished: Mount F150 steering box and get front panhard bar installed.

:thumbsup: I got the front pretty much mocked up (tacked) in place. This is the first swap of this type that I have ever done, I ENCOURAGE ANY AND ALL FEEDBACK IS MUCH APPRECIATED. Especially before I start to final weld everything in place. :) PLEASE COMMENT. :)

Steering:
***Before I start on the install of the steering box. Its important that you pick up a oil filter relocation kit. Its a tight fit between the engine and frame.

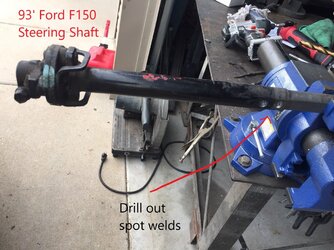
Im going to talk mainly the steering shaft and the modifications I did to make this work. Unfortunately the Stock 93' F150 shaft wont mate to the 97 Explorer steering column. The box install has been touched by many others. ie: @johnny499 Mountaineer thread was a huge help.

93' Ford F150 Shaft - there are 2 spot welds on each side of the shaft that need to be removed. You need the lower section/rag joint to mate to the steering box.
index.php


Stock 97' Ford Explorer Steering Shaft-
index.php


97' Ford Explorer Steering Shaft - Where to cut? there is a 'keyed' shape that matches F150 steering shaft.
index.php


F150 and Ford Explorer Shafts joined
index.php


Final completed shaft. Note that a large section of F150 shaft has been removed and spliced at the rag joint. I TIG welded the butt weld to ensure good penetration. This shaft still slips like the original Explorer shaft. Tight Space in there.
index.php


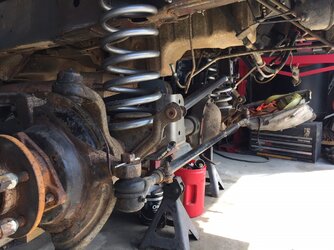
Steering Box installed - Clearance of final installation. Zero binding, smooth turning from inside. Sure is a great feeling to be at this point.
index.php


F150 Steering Box installed:

Added info. If you want to convert your pressure port to accept an AN6 type fitting, there is an adapter that you can pick up. The port has 1/2-20 threads in it (smaller port). (AN6 to 1/2-20 Inverted Flare) This adapter will allow you to have a standard high pressure hydraulic hose with AN6 fitting made for this application. Part number for adapter is FRA-491955.

You can take your stock Explorer hose (if in good condition) and have a 90 degree AN6 fitting crimped on at steering box side to mate the box to your stock power steering pump. Return line should be made easily.

index.php
 

Attachments

  • full.jpg
    full.jpg
    294.6 KB · Views: 175


Looks like a great job. You might want to slap a piece of loom over those fuel lines to avoid the zip tie from sawing through in time.


Panhard Install - Suspension Photos: All I have left to do is finish steering rods using 1ton GM Y-Steering setup.

index.php


index.php


index.php


index.php


index.php


index.php
 

Attachments

  • full.jpg
    full.jpg
    270.5 KB · Views: 149


Looks like a great job. You might want to slap a piece of loom over those fuel lines to avoid the zip tie from sawing through in time.

Thanks. The zip tie is to get stuff out of the way of the plasma cutter and to get my hands in there. I plan on re-doing all the lines or re-mounting the factory lines. Got too many things 'mocked up' at this point...thank goodness for task lists. :)


Upper spring bushing/keeper shaft thing :crazy: 
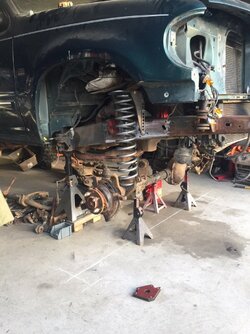
cut from Jeep Cherokee - bolted to upper spring mount plate.

full.jpg


Bringing back up for feedback before I start welding this beast together. Im ready to set on all 4 tires. :)


The time has come. I pushed hard last week and finally got the beast on the ground on all 4's. I have read so many times how great it feels to be at this point - It certainly feels great and accomplished. I still have much to do, but for this being my first 4x4 type build vs Hot Rods the past 17 yrs, I'm pretty proud of what I have done so far.

Here she is right after she touched down on the ground
index.php


@CDW6212R - As for getting her out - I had to put new shoes (stock tires) on her to bring her into the sunlight.
index.php


index.php


index.php
 

Attachments

  • full.jpg
    full.jpg
    281.6 KB · Views: 167


Join the Elite Explorers for $20 each year or try it out for $5 a month.

Elite Explorer members see no advertisements, no banner ads, no double underlined links,.
Add an avatar, upload photo attachments, and more!
.


I slapped the 33's on them and decided to take a 'family' photo

index.php


index.php


index.php


index.php
 

Attachments

  • full.jpg
    full.jpg
    290 KB · Views: 159


Back
Top