Section525 - D44 2nd gen. leaves SAS | Page 8 | Ford Explorer Forums - Serious Explorations

  • Register Today It's free!

Section525 - D44 2nd gen. leaves SAS

Status
Not open for further replies.
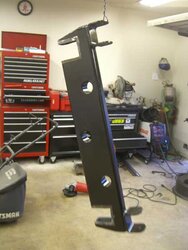
Well since I have the axle in-hand finally... I guess I can start my thread.

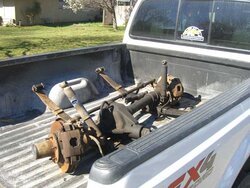
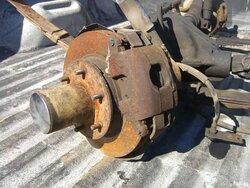
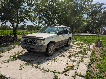
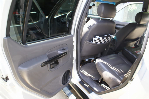
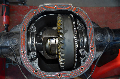
I bought this axle about a month ago from a guy in OR and finally made it around to picking it up yesterday. I watched as he actually took the axle out from under the truck. It's pretty clean.

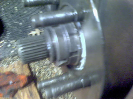
1983 Jeep Wagoneer LP D44

The plans:
Rubicon Express leaf springs (unless someone suggests otherwise)
4.88s
Detroit

Then SOA the rear, add a locker, and 5x4.5 to 6x5.5 adapters (I heard they make them). So far I am thinking about going 35/36s BFGs or IROKs.

So.... any suggestions?
 

Attachments

  • 001.jpg
    001.jpg
    44.3 KB · Views: 7,031
  • 002.jpg
    002.jpg
    43.4 KB · Views: 7,073
  • 003.jpg
    003.jpg
    49.6 KB · Views: 7,017


Join the Elite Explorers for $20 each year.
Elite Explorer members see no advertisements, no banner ads, no double underlined links,.
Add an avatar, upload photo attachments, and more!
.


:thumbsup:
 

Attachments

  • 05.jpg
    05.jpg
    25 KB · Views: 1,286


Join the Elite Explorers for $20 each year.
Elite Explorer members see no advertisements, no banner ads, no double underlined links,.
Add an avatar, upload photo attachments, and more!
.


that's exactly what I used for spring hangers also. Cheap is good!


Here is the crossmember in it's infancy. The side are angled slightly to give it a less blocky look. The caps will be welded and grounded smooooth for bling factor. It should be pretty damn stout when it's said and done though.

I may drill some 2" holes in between the frame rail and sleeve them for both form and functionality. It will make it look less like a 2x6 and will also allow air to get to the lower part of the radiator. :thumbsup:
 

Attachments

  • 01.jpg
    01.jpg
    20.9 KB · Views: 1,247
  • 02.jpg
    02.jpg
    21.1 KB · Views: 1,251
  • 03.jpg
    03.jpg
    40.3 KB · Views: 1,270
  • 04.jpg
    04.jpg
    43.2 KB · Views: 1,248


Bling bling.

The back of the hanger will be gusseted, then plated to polish it off.
 

Attachments

  • 07.jpg
    07.jpg
    31.3 KB · Views: 1,237
  • 06.jpg
    06.jpg
    30 KB · Views: 1,227
  • 05.jpg
    05.jpg
    28.1 KB · Views: 1,249


It'll be coming along fast here soon. I should be done before Stic-o at his rate. :p :D

Sorry Stic-o


At least your pets support what you're doing. :)
 

Attachments

  • dogs.jpg
    dogs.jpg
    52.3 KB · Views: 1,231


section525 said:
It'll be coming along fast here soon. I should be done before Stic-o at his rate. :p :D

Sorry Stic-o


At least your pets support what you're doing. :)


Ouch! :(


Well I sleeved three holes through it. Hopefully it looks better when I debur the inside edges and paint the whole crossmember. :p :rolleyes:
 

Attachments

  • 04.jpg
    04.jpg
    30.2 KB · Views: 1,218
  • 03.jpg
    03.jpg
    32.5 KB · Views: 1,226
  • 02.jpg
    02.jpg
    32.9 KB · Views: 1,234
  • 01.jpg
    01.jpg
    28.7 KB · Views: 1,227


hey section about how long did it take for u to punch through one side of that square stock with the hole saw?


Probably about 5 minutes per hole. :D The belt kept slipping on my 1921 drill press so I could not put much downforce on the bit.


Progressss...


Think this will be tough enough? I am thinking I may need some gussets from the bottom of the frame to the crossmember. What do you think? Or am I paranoid?
 

Attachments

  • 1.jpg
    1.jpg
    49 KB · Views: 1,214
  • 2.jpg
    2.jpg
    38.3 KB · Views: 1,191
  • 3.jpg
    3.jpg
    24.7 KB · Views: 1,218


ahah well you've already painted it! cant weld onto that beauty anymore!


It's primer. :p I masked off where it will be welded to the frame. That way I only have to paint the welds and not the entire crossmember. Yes, I am bored. :D


yeah i think gusseting is worth it (plus your bored - hehe). cauz if i can remember corrently, there are bulges on the side of the frame rails where you currently have the cross member sitting. unless you've perfectly mirrored the outline of those bulges onto the cross member, thats probably going to be somewhat of a weak weld because there will be gaps between the cross member and the frame rail - and as u know, the tighter the fit, the better the weld.


dude.. your explorer is gonna be fast as hell with those holes in that crossmember. That is probably the beefiest xmember I have ever seen though! I personally don't think you need to gusset it. I think you'll be fine but hey.. I'm not driving it.


jasonb said:
but hey.. I'm not driving it.
Ahaha true.

here, for your cross member:
Devcon-Epoxy.jpg


section525 said:
Think this will be tough enough? I am thinking I may need some gussets from the bottom of the frame to the crossmember. What do you think? Or am I paranoid?
Paranoid, very paranoid. That will be more than enough.


jasonb said:
dude.. your explorer is gonna be fast as hell with those holes in that crossmember. That is probably the beefiest xmember I have ever seen though! I personally don't think you need to gusset it. I think you'll be fine but hey.. I'm not driving it.

I still need to port and polish the holes for better air flow. But it's getting there.
 

Attachments

  • 4.jpg
    4.jpg
    25.5 KB · Views: 6,486


for the center hole:

s_propr.jpg

if you get stuck, just turn the propeller on for thrust.


Join the Elite Explorers for $20 each year.
Elite Explorer members see no advertisements, no banner ads, no double underlined links,.
Add an avatar, upload photo attachments, and more!
.


IZwack said:
Ahaha true.

here, for your cross member:
Devcon-Epoxy.jpg


all you need is zip ties... they don't have to dry.


Status
Not open for further replies.
Back
Top