LD50 Full-size axle thread `93 Ex | Page 17 | Ford Explorer Forums - Serious Explorations

  • Register Today It's free!

LD50 Full-size axle thread `93 Ex

LD50 Full-size axle thread `93 Ex SAS

Hey fellow Explorer enthusiasts!

Well I never thought I`d do it, but it`s time.
I originally thought I would go to a smaller rig one day but I`m going to beef up the Explorer instead. Since I already have a huge thread on my previous work I decided to start fresh.

If you would like to see my previous mods, you can navigate from my signature link, or click here:
http://www.explorerforum.com/forums/showthread.php?p=523171#post523171

~

My plans are to install a D44 and 9-inch into the station wagon and run 35 inch tires. Hopefully she`ll still get in the garage, but if it don`t then oh well. During this I also have some body work to do.

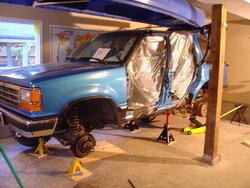
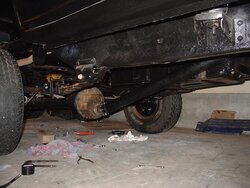
Right now I have the rear end out, I took off the spare tire hanger and removed the muffler and rear most heat shield. (doors are off for body work)Next the gas tank comes out so I can prep the underside for rust protection, from the t-case back. In the meantime I am trying to sell some parts for cash.

First big decision is what gear ratio. The 4.10`s on 33s was nice, but I think I`d like a bit more torque than that so I`m thinking 4.88 or 5.13s.
 

Attachments

  • prep.JPG
    prep.JPG
    62.9 KB · Views: 10,432


Join the Elite Explorers for $20 each year.
Elite Explorer members see no advertisements, no banner ads, no double underlined links,.
Add an avatar, upload photo attachments, and more!
.


Fibreglass is a lot of work and expensive, and I don`t know if I like the look.
Probably go rubber, and if Bushwacker is the molded kind, they would not fit now.

I'll take your old ones off of your hands.

Carson


They`re not on my hands, the front two are on the truck and the other two are on a shelf.

:D

Probably could do that Carson. Just found out saddleman only makes up to a 3 inch flare too, so looks like I might have to go mail order again from the US, darn it.


so are the wheels on this damn thing yet?????


Oh yeah! I have a project going on, slipped my mind there, lol.
Grueling week at work man, haven`t done more than look at it since I put the fronts on. I`m going to order some Pacer flares I guess, thanks for the link Premier. I`m going to measure for and bring my driveshaft in for lengthening tomorrow, but still have to figure out shock placement. The front will be easy to compensate since the upper mounts aren`t in, but the backs are kind of fixed in place so I don`t even know if I have to re-work the mounts back there yet...

:D I`ll be here soon tho`:
 

Attachments

  • signage.JPG
    signage.JPG
    63.5 KB · Views: 704


haha love the sign....i got real lucky with my rear axle, since the pinion is longer the stock d-shaft is the right lenght...i just had to put a one ton slip yoke on and flip it around...cant wait to see pics of you on the anti snomobile and anti camper roads....


Well if they are or not im ready to see this thing in action. I dont want to see it get dirty tho... ha ha


hahahaha
x2


So what do you have going on in the rear. I think you have two inch lift springs, but what about shackles? How much lift in the rear would you say you have over stock?


Lift over stock? I guess I could measure my wife`s Ex and compare, but where would you want me to measure from?
frame to axle? Axle to to underside of cargo compartment?


spring hangers and bumpers


Kay, my bumpers are modified two inches higher to match the 2 inch body lift tho` and I don`t have big tires on so measuring to anywhere but the axle is kind of irrelevant. My OME lift springs may have sagged a smidgeon, so take that into consideration -i.e the lift is kind of frankenstein back there...


My shackles are 7 5/16 center of hole to center of hole
-Stock length was 5 1/2
Springs are OME 2 inch lift springs
Axle is under springs

Shackle, spring and SOA will now be classifified as suspension lift in the following calculations:

I measured "lift" as actual lift over stock, with my wife`s 92 four door as reference.
And I measured from center of axle to frame, about where the axle would strike the frame if it travelled straight up into it.
(it just seemed the most accurate to do it that way, and calculate the rest)

Stock was 7 1/2 inches
Mine was 16 Inches

= LD50 rear end suspension lift 8 1/2 inches over Wife`s stock 92

Including the 2 inch body lift, overall lift = 10 1/2 inches over stock

Considering stock tire size is 29", and my 35s are 6" taller, a measurement from fender lip above rear tires to the ground should show an approximate truck height lift of 13 1/2 inches over my wife`s stock 92


Now the 92 does look a little sagged down in the rear, so actual new stock may be different, but that`s the ballpark figure anyway.


wow, well i wanted to go solid.....but after what i seen u did! wow!
maybee if i had a tone of cahs, and a second car to drive! but this is no weekend job lol!!!!!!
maybe i will just stick to getting my 4 inch and 1inch coil spacer in the front and do a soa in the rear!
man i needa call audiodude......any one hear from him let him know im still alive lol!


I been trying to figure the shocks out and am modifying my old Warrior shock mount/skidplates to lower my mount so I can get the most travel.
At the same time, due to a hurried perch weld-on, my pinion angle was off by 5 degrees.
I am following the idea that the pinion angle on my axle must be the same as the angle on the output of my t-case plus 2 degrees that compensate for cruising torque, which equates to 2*.
I didn`t want to buy cheap aluminum pinion shims so I had some made at the local machine shop at the same time they lengthened my axle.
I measured for axle length from yoke to yoke and it ended up being extended by about 4 inches.
The shims have a hole in them for the leaf pack bolts to sit in and were welded to the perches after the pic was taken..
 

Attachments

  • pinion shims.JPG
    pinion shims.JPG
    59.4 KB · Views: 655
  • driveshaft.JPG
    driveshaft.JPG
    58.3 KB · Views: 662


Another crappy thing I noticed on the track bar upper bracket was that when the steering wheel was turned a little bit side to side, the 9/16 bolt had play of just shy of 1/8 of an inch in the holes of the mount. My thought is it was just worn out from so many years of use. After kicking myself for not noticing it sooner, I fixed it.
I used a 1 inch hole saw to cut two 1-inch round pieces from 1/4 inch plate, then I drilled the center holes to 9/16 and welded them to either side of the bracket.
Tight now.

Tomorrow I hope to finish the rear shock mounts and get some bearing straps on the rear u-joint..
The yoke on the pinion fit my stock Ex U-joint just as the front did.
I have definitely identified my axles as from 78/79 bronco now.
 

Attachments

  • trackbar mount repair.JPG
    trackbar mount repair.JPG
    71.4 KB · Views: 682


I feel a lot better about my pinion angle now. you did it the same as me.


Froader doesn`t like it tho` :D
It does seem abrupt, but my pinion would have to drop about a foot before anything binds, as far as I can tell, that won`t happen.


FOR REFERENCE

improperly set pinion angle causes vibration which can lead to early parts failure. The vibration results from unequal velocities at the opposite ends of the drive shaft. When a U-joint is run at an angle the drive shaft will actually speed up and slow down twice during each revolution, due to the changing angular velocity of the U-joint ends.

Take a look at [ld50`s driveshaft pic] to help understand why the drive shaft speeds up and slows down. The U-joint caps connected to the pinion yoke spin around the pinion without moving forwards or backwards, when viewed from the side. The U-joint caps on the drive shaft move forwards and back quite a bit when viewed from the side, causing a change in the speed that the drive shaft rotates.

There will be no vibration if the angles are the same at both ends of the drive shaft becuase both ends will speed up and slow down at the same time and in the same amounts. If the angles are off the U-joints will still cause the speed to change at the same time (unless the drive shaft is twisted) but in different amounts, causing vibration. Keeping the pinion paralell with the output of the transfer case will keep the angles the same, avoiding vibrations.


http://www.4x4wire.com/tech/pinionangle/

This represents a standard driveshaft setup that is done correctly. Note how the angle of the pinion is paralell with the angle of the transfer case output. Pinion and transfer case output angles are shown in orange. The drive shaft angle is exagerated in these drawings.
 

Attachments

  • stdgds.gif
    stdgds.gif
    1.4 KB · Views: 639


Join the Elite Explorers for $20 each year.
Elite Explorer members see no advertisements, no banner ads, no double underlined links,.
Add an avatar, upload photo attachments, and more!
.


Yup thats the same info I found. I drove my truck at about 50-55mph and had no vibration at all.

I found this on bmxkings thread

This is his reply from a different PM. I don't have the PM that I sent (so that you understand what I said about #1 ,etc.)
"Close.
#1 is correct. T-case output is at 4*. So you want your pinion angle to get 4* so you don't have any driveline vibrations.
#2. Mounts the leafs on the truck, and on the bottom of the leaf, where the spring perches will touch, measure that. Mine were about ~2*.
#3. Set the axle on jackstands with the pinion at 0*. If you put the perches on at 0*, the spring would rotate the pinion up 2*. But you want 4. So with the pinion sitting at 0*. You want to weld the perches on at 2* (that is, the front of the perch is angled down, torward the pinion 2*) and thats who you get your 4* pinion angle.
Lemme know if ya got anymore questions, glad I can help."

Jason, I'm probably taking it offroad tonight or tomorrow. :D


Back
Top