Pugly | Page 52 | Ford Explorer Forums - Serious Explorations

  • Register Today It's free!

Pugly

The Good, The Bad, & the Pugly :D

1994 Purple Explorer XLT 4wd


I decided to have a registry for my "Other" rig so I can post things done and have a reference for it.

Pretty much stock drive train.

4.0 OHV-A4ld-1354e.
D35 front 4:56 Yukon gears, Aussie Locker.
2nd gen disc 8.8 rear 4:56 gears, Spartan Locker.

Front C-Clip eliminator Mod.

Slight lift with 2" Skyjacker coils & rear F-150 hybrid leaf packs.

3" PA body lift
Helpful thread with pics for the front body mounts
Pics of front body lift mounts

Swapped to manual hubs.
Double U-joint XJ steering shaft.

33" x 12.5" x 15" Cooper Discoverer ATX3, mounted on 15"x10" AR Outlaw1 alum wheels - full size matching spare.

Shocks:
Front Rancho 9000xl
Rear Rancho 9000xl
Duff Stabilizer shock.

Sway bar quick disconnects front & rear.
Custom tube sliders w/kickouts

22" LED light bar.
18w amber fog Led pods.
55w rock lights--2 front--1 rear over diff.
8 LED pods for rocker lights.

Full brush guard.
2.5" Fender Flares.

TTB Diff guard & Skid plate.

Custom roof rack with 48" Extreme Hi-Lift jack.

Flipped Tow hitch & front hooks for tow points.

Cobra19 CB & rear hatch mounted firestick antenna.
Rear view HD camera.
JVC DVD/CD/MP3 Head unit with 7" HD Monitor.
Sony 6.5" front speakers.
Rockford Fosgate 5.25" component rear speakers.
8" JL Audio sub in 2001 enclosure with 500w amp mounted on enclosure.

Custom made center console with CB/Rear view color monitor/2-12v outlets/ in-out temp display. D cell Maglite mounted on cargo panel. Truck bed liner on cargo floor.
Custom Cargo storage box with topside spare tire mount.

'99 Eddie Bauer Front Leather buckets.
'94 Limited Rear leather split bench.


Pugsnewshoes_zpsf609e609.jpg

puglynewbrushguard1.jpg

94frontpassprofile.jpg

puglyrti2.jpg

puglyrearrti1.jpg

puglyrti1.jpg

aftermathmudbath2.jpg

puglysnewseats.jpg

cbantbracket.jpg


Join the Elite Explorers for $20 each year.
Elite Explorer members see no advertisements, no banner ads, no double underlined links,.
Add an avatar, upload photo attachments, and more!
.


Did anybody do a thread just for this conversion? Ever since I got a Redhead steering gear and the Maxxis Razr 35's, I have noticed the PS could be better.
I haven't seen one, at least that I remember. The instructions that come with the brackets are more than adequate. It's a matter of removing the old pump, cutting the stock bracket ears down, then bolting the new/used pump in.


Join the Elite Explorers for $20 each year.
Elite Explorer members see no advertisements, no banner ads, no double underlined links,.
Add an avatar, upload photo attachments, and more!
.


Did anybody do a thread just for this conversion? Ever since I got a Redhead steering gear and the Maxxis Razr 35's, I have noticed the PS could be better.
I have a thread on the bracket kit itself, and planned on doing the write up on it there, after I get it installed. I will put the link here when it's done.


You really use Mercon v in the power steering with the Saginaw pump?


I’m not sure you want Mercon v in your power steering Mercon iii maybe I use power steering fluid as ford suggests


Been using trans fluid in power steering for years. It's not a sensitive system that I'm aware of. Hydro fluid is hydro fluid in non sensitive systems, I have been told. If there is a solid reason not to use it, then I'm all ears.


Mercon v is too slick for power steering and transfer cases

I was like you I only have Mercon v in my shop at all times so I always used it in my ps pumps and t cases, then ford changed things and said Mercon v is not for t cases…..and because the steering reservoir cap says “ps fluid only” and this was the other system I already ran Mercon v in.
I never had any issues with my power steering but we did see a few 1354 transfer cases blow up with Mercon v in them and I did replace a few
Power steering pumps (high miles)

So I switched
Ps fluid in the pump and rack, Mercon iii or t case fluid in the t cases

Research online shows you should be fine w Mercon v in the power steering system, but not for t cases…. I just did some checking bob is the oil guy…. So it’s just my personal choice


Yes, I am up to speed on the T-cases and the changes made. I run Redline, Royal Purple, or Amsoil Synthetic in the AtlasII, and started using Fords LV fluid in the 1354.

The 1st gens gearbox seals can handle most all fluids from what I know. The Saginaw pump is new to me, so if those seals need a special fluid, I'm fully open to using whats recommended for that use.


I also stopped using ATF in the PS, when Ford had changed the ATF 2-3 times in ten years. PS fluid has always been approved for PS, so with that there is no confusion about what version to use. I like the Valvoline PS fluid, and their transfer case fluid(cheaper than the three other ATF versions recommended). Amsoil makes good ones too, but those are much more expensive.

ATF you have to be familiar with the various applications. I've got an AOD trans which was never a Mercon I(there was never a Mercon II or III or IV(that Mercon/Dexron III is Mercon I and Dexron III)) designed unit, but Ford changed the recommendation from F to Mercon when it came out. Then they changed it again to Mercon V, which as Jamie said, it is slicker and that's a risk to use in an older type F transmission.


Just to clarify. The PS pump dictates which fluid is used, not the steering gear box, correct?


For the stock box and stock p pump, not so much. They can handle, and have handled, everything I have used, over the last 15 yrs.

I will do some reading up on the Saginaw pump later, but have already been told by a dealer tech, they can handle most fluids as well.

This talk about fluids is all going to be a personal preference and everybody's own choice. Never meant for this sag swap to get sucked into a fluid debate. Lol


Been an incredibly wet few weeks here. Finally the sun came out last weekend, and @KurtECV made the trip up for the weekend. Kicked it off on Friday night with a killer concert for The Warning, then broke out the wrenches early Saturday morning. We tackled the Sag pump swap!

After flushing the system with clear steering fluids, it was flushed again with a full can of Kooler Kleen, then compressed air. Now it's clean dry install.
Propped the hood with an extra prop, Took the belt off, removed the 4 bolts and harness connectors for the A/C compressor, lifted it slowly, and hung it from the hood out of the way.
After removing the return line and 3 bolts for the bracket, the bracket with the pump still on, it was lifted enough for a nice easy access to the high pressure line removal. Carefully manipulating the assemble around the AC line, it comes right out easy peasy.
Having the bracket on the table, made it easier to use the impact to remove the pulley. Now the pump comes off, and thrown off a mountain cliff, and into the pits of hell.
The bracket was a dirty mess, so it was cleaned up and set into the bench vise. The top ear gets cut off as shown in the sag kit directions.

sag 1.jpg


It's not a straight cut, as I went around the bolt boss to keep as much meat there as possible. Used an angle grinder cut off wheel, and smoothed it up with a flap disc. It will Chooch!

sag 2.jpg


Back to the work table, and the adapter plate gets bolts on like this...

sag 3.jpg


Flip the bracket over, and this spacer plate.....

sag 4.jpg


Sits like this...

sag 5.jpg


Now the new Sag pump bolts on with bolts from behind, with that spacer between the pump and bracket.

sag 6.jpg


sag 7.jpg


With the pump now on, Swap the stock pressure unit from your old pump to the new pump. Follow the kit directions here carefully! The assembly now goes back on the engine. This resi bottle sits on the side, not behind like the stock bottle did. The AC line will seem like it's an issue (in the way), but it's fine. Get to that in a minute. With the 3 bracket bolts installed, put the high pressure line on with a stubby 18mm ratchet box wrench, and do not forget the new nylon ring gasket on the flare nut! To avoid "Rolling" the new ring, use a pick with a shot of lube, and thread it on all the way to the shoulder bottom.

sag 8.jpg


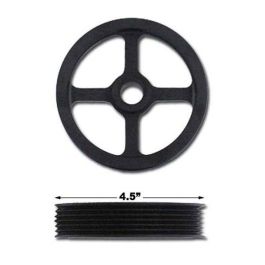
Now it's time to get the pulley back on. I went with the smaller 4.5" PSC alum pulley for this mod. The reason for doing the pulley at this stage, is because you have to take your time, and slowly press it on, and line it up with the other pulley's perfectly. This was the hardest part of the entire job. Once happy with alignment, slap the belt back on. At this point, the intake tube can go back on. Install is done!

sag 9.jpg


You can see how much room there is now behind the new pump with the resi on the side on the pump.

sag 10.jpg


The AC line was "Moved" by hand by bending the elbow behind the pump. Not much, just a smidge to create a bigger gap at the plastic resi bottle.

A rear view, taken thru the wheel well.


sag 11.jpg


Fill with Merc V (per kit directions) to the cold fill line. With the rig on jack stands and front wheels off the ground, it's time to bleed the system.

With engine OFF..... Turn steering wheel close to lock one direction, then close to lock the other. Now do this about 50 times. Seriously. It helps to have someone watch the resi bottle as this is done. They can see air bubbles rise up in the fluids as you bleed it. The see thru bottle really helps here! Once no more air bubbles are seen, start the engine. Now go lock to lock another 50 times. Seriously, 50 times. You will hate me now, but thank me later.

If no leaks are found, and the belt looks good, take it off the jackstands, and take it for a test ride. For us, the install and bleed procedure was a one & done.
Ok, so it's been a few days now, and I can gladly say.. this mod was well worth it. It is 100% silent, and sooo much easier to turn the wheels. The smaller pulley was an added expense, but for oversized tires, it was worth every penny. It turns them big meats on pavement like butter over hot bread. In loose gravel/dirt, even easier.


Parts #'s
Sag swap kit: Proquipped P1 adapter kit https://proquipped.com/shop/ols/products/p1-adapter-kit
Sag pump Napa #: PS 381314N (2006 Jeep Liberty V-6)
PSC pulley #PP2401: 4.5 Inch Power Steering Pump Pulley, 6 Rib Serpentine
for Type II/CBR/CBX Power Steering Pump
Resi cap was a Dorman brand for the Heep Lib, as it's not included with the new pump for some odd reason.
It's not a cheap pump swap, but if your tired of a weak sauce whining Ford P pump, then the costs of this will not bother you at all. I'm happy its done, and happy I had help doing it. Plan on half a day!


That is a pretty badass swap. Stupid easy too.

I'm impressed with it and if I ever get another 4.0 that will be the Go-To when the stocker goes out.


Excellent work there, and those are great pictures. I'm sure this will lead the way for many others to upgrade their PS pumps. Enjoy the new steering.


It's nice to have a detailed write-up that shows how simple it really is to do this swap.

I do have questions; Does the new pump stick out to the side more than the OEM pump? If so, how much in general terms? Does it stick out past the inside of the frame? Finally, the smaller pully generates more line pressure, correct?

I have my battery relocated to that side, and the coil over hoops and coil over shock reservoir are over there. I don't have that giant ABS pump anymore. They are outside of the AC line so I think everything will still fit with my Explorer. I will be purchasing your entire parts list as soon as I am fairly confident it will clear. The pictures on the link you provided for the brackets make it seem like it will clear all my added stuff.

I think the pully part number is PP2401

Edit: I priced it out and it seem the entire swap is under $400, so not bad for correcting the power steering issues.
The pump doesn't, but the resi bottle does. That's why I moved the AC line a hair. It's not much, maybe an inch or so. I can take a better overhead picture for you tomorrow, and throw a tape measure at it. It doesn't go past the frame rail.
The swap directions was done with a Ranger, and the battery is on the Drivers side. They add a note that the AC line might need massaged a bit for that setup. If it works in both the ranger and the explorer, you should be fine with that.
The smaller pulley should increase volume, not pressure I believe. It's turning the pump faster, pushing more fluid (GPM's).
Your right about the extra P in the part number. When I entered the post, the silly p turned into a :p and I deleted it, not realizing what happened. Good Catch! lol

The costs are higher than just another stock pump, but man, what a difference! You can now remove the pump with the pulley on it, unlike the stock pulley setup.


I like it very much!

Thank you for the detailed write up
Considering this for the neighbors 4.0 ranger for sure


Just a thought on the pulley alignment, we know you cam pull the pump and bracket with the pulley on,

I wonder if you could use a micrometer from a fixed point on the bracket to a point on the pulley, get a depth measurement and then transfer that measurement to the new pulley so youd know it was correct during installation of the new pump?


The pump doesn't, but the resi bottle does. That's why I moved the AC line a hair. It's not much, maybe an inch or so. I can take a better overhead picture for you tomorrow, and throw a tape measure at it. It doesn't go past the frame rail.
The swap directions was done with a Ranger, and the battery is on the Drivers side. They add a note that the AC line might need massaged a bit for that setup. If it works in both the ranger and the explorer, you should be fine with that.
The smaller pulley should increase volume, not pressure I believe. It's turning the pump faster, pushing more fluid (GPM's).
Your right about the extra P in the part number. When I entered the post, the silly p turned into a :p and I deleted it, not realizing what happened. Good Catch! lol

The costs are higher than just another stock pump, but man, what a difference! You can now remove the pump with the pulley on it, unlike the stock pulley setup.

I have the same conversion and love it. The reservoir on mine is mounted between the core support and the grill. Did you add a power steering cooler?


Join the Elite Explorers for $20 each year.
Elite Explorer members see no advertisements, no banner ads, no double underlined links,.
Add an avatar, upload photo attachments, and more!
.


@KurtECV imagine you could but that's not something I would try to share, as it could go wrong for someone, and blame me for it. Pass.

@Rick that's awesome you did this, I had no idea. I didn't add a cooler yet. Was going to add my used 2nd gen cooler, but decided to get a new one, and do that later.


Back
Top