dpappyp
Member
- Joined
- February 11, 2008
- Messages
- 17
- Reaction score
- 1
- City, State
- milwaukee
- Year, Model & Trim Level
- 2000 Mountaineer
Thanks to MountaineerGreen:
Header install:
http://www.explorerforum.com/forums/showthread.php?t=129083&highlight=collector+engine+mount
Heat spacer install:
http://www.explorerforum.com/forums/showthread.php?t=153944
and V8BoatBuilder:
Header Install:
http://www.explorerforum.com/forums/showthread.php?t=172258&highlight=summit+spacer
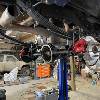
On day one I sprayed down all the exhaust bolts with liquid wrench and on days two and three used the 50/50 mix of acetone and ATF (used an old spray bottle with a "stream" setting as the applicator).
I first took off the upper intake manifold using MountainGreen's writeup and went without a hitch.
Then, I started on the header portion and removed the passenger side exhaust manifold first. I don't know if the acetone/ATF mix is to credit, but my mounty has spent its whole life in the Milwaukee area and did not have one bolt that was seized up with rust. All of the exhaust manifold bolts came out very easily. The collector bolts were more stubborn, but it seemed to be because they were just torqued down more and not because of rust.
For the engine jacking part on the passenger side I did not loosen the two engine mount nuts on top like the two writeups from MountainGreen and V8BoatBuilder illustrated. Instead, I used the alternate method of loosening the nut on the bottom of the engine mount. Once you figure out how to get a socket on it it loosens easily. To get at it I used an universal double-jointed socket adapter, wrapped once or twice with electrical tape to stiffen it, otherwise it flops around too much to get it on the nut. I had read other posts how you needed a wobbly socket extender to get at the nut, but my way worked well for me.
My catback exhaust that was already on the mounty is from Gibson and did not fit well so the whole exhaust system was pushed forward towards the engine bay. This caused issues on both sides with trying to get the headers to line up correctly to insert the mounting bolts. No matter how hard I pulled down on the header it just would not line up, they sat too high. I was able to muscle it down enough to get one bolt in on both headers towards the front of the engine, but that's all I could do. So, for both sides I ended up having to throw a strap around the header and down around the frame or driveshaft and ratchet it down.
I wasn't able to get all of the header mounting bolts in/torqued properly, due to not being able to get my fingers/tools on them. So for now I'm leaving it as is until I get some better fitting wrenches (crowfoot?). I was fully expecting to have some exhaust leaking because of this, but amazingly I haven't heard or noticed anything. Of course, though, I will not leave it like this, I just needed to have my mounty back (can't take taxis to work everyday).
After the headers were done I turned back to the intake manifold. Since I already had everything taken apart I figured it was a good time to replace the EGR valve. I almost had to replace the EGR valve sensor as well since I snapped one of the tube fittings off, but I just super glued it and hope it holds. I threw it back together and flashed the new 87 street tune I got from Henson and fired her up and like I said, amazingly no apparent leaks, yet.
Also, I did not put on any extra heat shield sleeves for the spark plug wires, just used zip ties to keep them away from the headers, same with the hood latch cable. I plan on adding them later, though, just to be sure.
All in all, it took longer than I hoped, but it went relatively smoothly; no broken or cut bolts just a smashed thumb and gouged pinky. First impressions are that she seems to run smoother and accelerate more effortlessly, I'm pleased.
Any questions or comments/concerns are welcome.
Thanks,
Dan
Header install:
http://www.explorerforum.com/forums/showthread.php?t=129083&highlight=collector+engine+mount
Heat spacer install:
http://www.explorerforum.com/forums/showthread.php?t=153944
and V8BoatBuilder:
Header Install:
http://www.explorerforum.com/forums/showthread.php?t=172258&highlight=summit+spacer
On day one I sprayed down all the exhaust bolts with liquid wrench and on days two and three used the 50/50 mix of acetone and ATF (used an old spray bottle with a "stream" setting as the applicator).
I first took off the upper intake manifold using MountainGreen's writeup and went without a hitch.
Then, I started on the header portion and removed the passenger side exhaust manifold first. I don't know if the acetone/ATF mix is to credit, but my mounty has spent its whole life in the Milwaukee area and did not have one bolt that was seized up with rust. All of the exhaust manifold bolts came out very easily. The collector bolts were more stubborn, but it seemed to be because they were just torqued down more and not because of rust.
For the engine jacking part on the passenger side I did not loosen the two engine mount nuts on top like the two writeups from MountainGreen and V8BoatBuilder illustrated. Instead, I used the alternate method of loosening the nut on the bottom of the engine mount. Once you figure out how to get a socket on it it loosens easily. To get at it I used an universal double-jointed socket adapter, wrapped once or twice with electrical tape to stiffen it, otherwise it flops around too much to get it on the nut. I had read other posts how you needed a wobbly socket extender to get at the nut, but my way worked well for me.
My catback exhaust that was already on the mounty is from Gibson and did not fit well so the whole exhaust system was pushed forward towards the engine bay. This caused issues on both sides with trying to get the headers to line up correctly to insert the mounting bolts. No matter how hard I pulled down on the header it just would not line up, they sat too high. I was able to muscle it down enough to get one bolt in on both headers towards the front of the engine, but that's all I could do. So, for both sides I ended up having to throw a strap around the header and down around the frame or driveshaft and ratchet it down.
I wasn't able to get all of the header mounting bolts in/torqued properly, due to not being able to get my fingers/tools on them. So for now I'm leaving it as is until I get some better fitting wrenches (crowfoot?). I was fully expecting to have some exhaust leaking because of this, but amazingly I haven't heard or noticed anything. Of course, though, I will not leave it like this, I just needed to have my mounty back (can't take taxis to work everyday).
After the headers were done I turned back to the intake manifold. Since I already had everything taken apart I figured it was a good time to replace the EGR valve. I almost had to replace the EGR valve sensor as well since I snapped one of the tube fittings off, but I just super glued it and hope it holds. I threw it back together and flashed the new 87 street tune I got from Henson and fired her up and like I said, amazingly no apparent leaks, yet.
Also, I did not put on any extra heat shield sleeves for the spark plug wires, just used zip ties to keep them away from the headers, same with the hood latch cable. I plan on adding them later, though, just to be sure.
All in all, it took longer than I hoped, but it went relatively smoothly; no broken or cut bolts just a smashed thumb and gouged pinky. First impressions are that she seems to run smoother and accelerate more effortlessly, I'm pleased.
Any questions or comments/concerns are welcome.
Thanks,
Dan