Section525 - D44 2nd gen. leaves SAS | Page 10 | Ford Explorer Forums

  • Register Today It's free!

Section525 - D44 2nd gen. leaves SAS

Status
Not open for further replies.
IZwack said:
hey section, please dont sit behind a firewall/router, i cant ping u .. kthx love u bye

You're not speaking my language, man. :confused:


Well my question about the steering box was more directed towards the crush dimple areas and how I should plate over them. The frame has two buldges right where I like my plate to go. So, should I cut the buldge out, then plate over it... or.. just plate over the buldges and not worry about it? :confused: :confused:


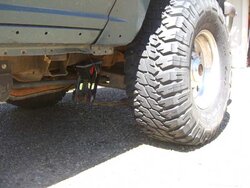
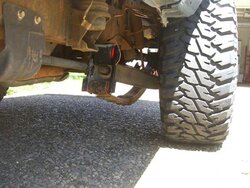
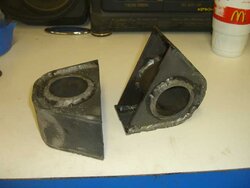
Here IZ, I just went out and finished my shackle mounts for you. :p

Still learning to weld.... :o
 

Attachments

  • things.jpg
    things.jpg
    18.2 KB · Views: 1,418


Join the Elite Explorers for $20 each year or try it out for $5 a month.

Elite Explorer members see no advertisements, no banner ads, no double underlined links,.
Add an avatar, upload photo attachments, and more!
.


Stic-o said:
This is what Jefe did, but I know he problems with it like this.

9-19_2.jpg


I plan to make a big plate of metal for the out side, and then two smaller pieces for the inside, sense the box has a hump that goes in the 1st gen frame. not 100% sure... I'll adress this issue in the week or two. :(
The top mount and rear mount have been great. Its the lower mount where the tube pulled through the frame.

My trail fix that never got fixed up:
4-22_5.jpg


I don't really think plating the whole frame is necessary. You just need enough to spread the load and get some good weld penetration. I'm thinking 2 or 3" dia. 3/16" washer-looking deal that the sleeves weld to, and then the 'washer' welded to the frame (both sides).

section525 said:
Still learning to weld.... :o
Yeah, we can see that. :p

:D


Jefe said:
Yeah, we can see that. :p

:D

Welding it tight circles is tough! :p :eek:

It doesn't look as bad in person. :(


When you sleeve the frame for the bolts, make the sleeves all the same length that way the one that is in the dip of the inside of the frame makes a flat mounting surface for your inside plate. At first mine was just sleeved and that was it, i kept breaking welds on the sleeves until i finally put a 3"x6"x3/16 plate on each side and it's been fantastic since.


now i know this isnt for your application, but www.frontrangeoffroadfab.com has a reinforcement kit for the ifs toyota steering box, this reinforcement is very coveted on the toyota sas.... might want to jsut look @ that for an idea

i say plate over the crumple zone


section, looking great dude!!! Keep up the good work!

The front x-member is by far one of the best ones I've scene to date.


section525 said:
So, should I cut the buldge out, then plate over it... or.. just plate over the buldges and not worry about it
Yeah those bulges worry me too .. I was thinking of heating and flattening them. The frame rails are somewhat thin so it shouldnt be too hard once heated.

But do let us know what you're decision is cauz some of us need to take care of this in the near future.


Jim.. that Tacoma that hangs out in my shop used the Front Range kit so that's what we're building off of. It is a very trick setup. But the Tacoma is a little better off since it has a flat frame. :(

Taco-xmem-025_main.jpg


Taco-xmem-032.jpg


Mine will be virtually the same as that. I just need to decided what to do about my huge buldge. :D


Mock up!! :cool:

Used my old Explorer shackles in the rear. :p When Gordon brings the Taco over I'll get a good idea of how much lift this setup will give me. I'm a little scared it will be too high. But keep in mind the BL is coming out too. I wouldn't mind if it was around 6-8" total. So no more than 3" higher than now. :)

PS: Maybe I should leave the IFS in too just as a backup?? :p
 

Attachments

  • 001.jpg
    001.jpg
    38.7 KB · Views: 1,398
  • 002.jpg
    002.jpg
    33.9 KB · Views: 1,364
  • 003.jpg
    003.jpg
    41.7 KB · Views: 1,379
  • 004.jpg
    004.jpg
    37.9 KB · Views: 1,371


and 3" BL.


My plan is to finish it the week after my next rodeo. So April 24 - however long. :D


I'm still in the lead :bounce:

...if I get my axles back this week :rolleyes:


I think you are way ahead of me. My axle (housing) is still on the floor in my spare room. What's your ETA??


section525 said:
I think you are way ahead of me. My axle (housing) is still on the floor in my spare room. What's your ETA??

Well, I'd like to have it done by the end of this month....but that's not happing :( If I get the my axles back today or tommorow, I'll get the rear done this weekend and get the front axle all put back together. So honstly, I would say mid May :rolleyes: Our original goal was 6 weeks. but I lose my loner truck on the 28th, so after that it should be interesting with 1 car.... My dad will probbally let me use the t-bird for a few weeks though.


For the spring shackle hanger - move it back till it's almost vertical when you have no weight on the spring. The springs will flatten out when you add weight, and they will move up 2-3 inches.

You can see how it works, if you tack the mounts on, then place the vehicle weight on the springs - ie, jack up the vehicle and place blocks under those springs, let the vehicle down, and voila! you have a mocked up suspension with weight on it.


Leaf springs up front with the stock IFS stuff is sweet!!! You should leave it as it sits in that picture with both suspensions.


Join the Elite Explorers for $20 each year or try it out for $5 a month.

Elite Explorer members see no advertisements, no banner ads, no double underlined links,.
Add an avatar, upload photo attachments, and more!
.


^^Definitely...everyone knows that double the suspension, double the flex!!!! Too bad I don't have a 2nd gen IFS to install with mine. :p Looks good section


Status
Not open for further replies.

Featured Content

Back
Top