LD50 Full-size axle thread `93 Ex | Page 28 | Ford Explorer Forums - Serious Explorations

  • Register Today It's free!

LD50 Full-size axle thread `93 Ex

LD50 Full-size axle thread `93 Ex SAS

Hey fellow Explorer enthusiasts!

Well I never thought I`d do it, but it`s time.
I originally thought I would go to a smaller rig one day but I`m going to beef up the Explorer instead. Since I already have a huge thread on my previous work I decided to start fresh.

If you would like to see my previous mods, you can navigate from my signature link, or click here:
http://www.explorerforum.com/forums/showthread.php?p=523171#post523171

~

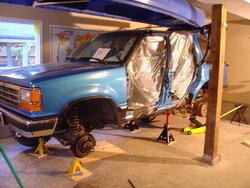
My plans are to install a D44 and 9-inch into the station wagon and run 35 inch tires. Hopefully she`ll still get in the garage, but if it don`t then oh well. During this I also have some body work to do.

Right now I have the rear end out, I took off the spare tire hanger and removed the muffler and rear most heat shield. (doors are off for body work)Next the gas tank comes out so I can prep the underside for rust protection, from the t-case back. In the meantime I am trying to sell some parts for cash.

First big decision is what gear ratio. The 4.10`s on 33s was nice, but I think I`d like a bit more torque than that so I`m thinking 4.88 or 5.13s.
 

Attachments

  • prep.JPG
    prep.JPG
    62.9 KB · Views: 10,433


Join the Elite Explorers for $20 each year.
Elite Explorer members see no advertisements, no banner ads, no double underlined links,.
Add an avatar, upload photo attachments, and more!
.


Cost so far?

You use to have a running total of how much money you have invested in the explorer. just out or curiosity, what is the total up to

Dave


Join the Elite Explorers for $20 each year.
Elite Explorer members see no advertisements, no banner ads, no double underlined links,.
Add an avatar, upload photo attachments, and more!
.


Yeah, I kind of decided not to run that again, I do have a huge stack of receipts in the garage, but I know I`ve misplaced some. Axle re-builds with lockers are close to 2 grand each alone. and then I busted them and had to throw out another 900. I`m at least another 7000-7500 cdn above my original mod tally now. -at least. Total investment including purcase over the years? 30,000+ ? :eek:


Steering stabilizer

Getting the truck insured pretty soon after hibernating it for a few months. I have a rancho stabilizer shock coming for an attempt to run some sort of stabilizer setup on it.
I`m tight for room in there and am considering connecting to the top of the drag link near the TRE then back to the frame. Thing is most D44 axles seem to be stabilized from axle to tie rod. Some vehicles do have a stabilizer off the drag link though.
Does it matter? My gut says you want a stabilizer closest to the force trying to turn the tires.


attachment.php


It doesnt matter, early Bronco's ran them on the draglink like you are talking about. :)


The reason you see most of them attached to the tie rod is because the tierod only cycles left to right horizontally with no up/ down movement. Your drag link is going to cycle vertically and laterally. If you engineer it right it could be fine, but be sure to consider passenger droop/ stuff and full lock to lock turn in both situations and every situation between. My jeep is attached to the draglink.


Done.

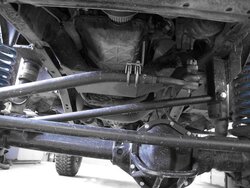
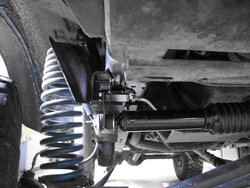
Made bracket for the draglink out of 1.5 inch u-bolt muffler style clamps and some angle iron.
Then welded two pieces of angle iron together and welded to my frame.
Yes I know I never do that as a rule in case I want to take everything off again but it was a simple bracket.

Haven't seen it it makes any difference at all, going to take a burn later to check it out. I only had some slight wander on road -bumpsteer. I was mostly hoping to lessen the forces back to my steering box off-road. Anyway, only 1000 more things to do before I just leave it alone I guess!
 

Attachments

  • stabilizer 1.JPG
    stabilizer 1.JPG
    45.3 KB · Views: 754
  • stabilizer 2.JPG
    stabilizer 2.JPG
    62.4 KB · Views: 753
  • stabilizer 3.JPG
    stabilizer 3.JPG
    60.5 KB · Views: 774
  • stabilizer 4.JPG
    stabilizer 4.JPG
    63.7 KB · Views: 766


In-Dash Rear camera.

This turned out kind of neat, turns out the rear camera monitor fits pretty well inside my dash. I cut the dummy vent portion off the trim and then popped the vent mechanism out and trimmed the trim piece a little further -as shown. The monitor actually fits so snug, it is held in place by itself.
 

Attachments

  • IMG_0247.jpg
    IMG_0247.jpg
    74.2 KB · Views: 1,191
  • IMG_0246.jpg
    IMG_0246.jpg
    50.9 KB · Views: 2,068
  • IMG_0245.jpg
    IMG_0245.jpg
    75.9 KB · Views: 2,080


good idea. I like that.


How are you mounting the actual camera to the explorer?


I have a in-dash screen and I just need the camera to have this


The camera kit was a Costco purchase I got for xmas a while back.
The Camera mounts to the inside of the license plate via double sided tape, and looks out from over top of it.
You are supposed to tie into the reverse light circuit for power, but I wired power to it through one of those blue switches you can see in one of the pics.
That way I can turn it on when I want to turn it on.
The camera sends a wireless signal to the video monitor, and had an antenna type lead which transmitted the signal.
 

Attachments

  • rear view whip.JPG
    rear view whip.JPG
    45.8 KB · Views: 1,703


D44 damage again

Same side I did last time, pass. side knuckle. I pulled into this mud puddle on a trail and actually got hung up on a log in there in a kind of funny way. I did not even notice it right away, till a buddy said only one front was spinning. Anyway, a rather benign looking little obstacle blows my knucle apart like nothing. I did scrabble a bit but didn't get her hopping or anything, just backwards then forwards to try to get more to the left.

I am thinkng a full Detroit up front wasn't the greatest idea. The trip I went on had a lot of driving involved but I only locked the hubs three times. I don't really have a lot of time on that knuckle since my last repair.
I`m having trouble with the idea that as soon as I get into a difficult situation, my knuckles will disintegrate.

I think I am going to pull that detroit out and put in a limited slip or maybe even open.
 

Attachments

  • Whip 09 Carnage 2.JPG
    Whip 09 Carnage 2.JPG
    101 KB · Views: 1,731
  • Whip 09 Carnage.JPG
    Whip 09 Carnage.JPG
    40 KB · Views: 1,700


all i see is a broken u joint. what broke on the knuckle?


Wrong terminology, sorry.
Shaft yokes, U-joint, shaft ends, The components inside the knuckle. I guess I am picking up some sort of lazy-ass jargon! (knuckle joints)
Anyway, as you can see, the U-joint is gone and the yokes are smooshed.
I don't know, maybe I should be buying the most expensive U-joints, It would be nice to be able to know what failed first. I`ve never seen everything come apart so evenly.


They almost always do that. Whenever a yoke breaks first, the U-joint will snap with it or when a U-joint snaps first, the yoke will go with it too. And chances are, it didnt shatter at the same time / evenly - you probably kept the driveline moving after the first crack which then resulted in breaking off the opposite end.


you can lose a cap on the joint and then break the shaft.
are you using full circle clips to hold the joint caps on?


I'd get another stock long side inner and stub shaft along with a Spicer 760X u-joint and tack weld the caps in and see how that goes before I would spend piles of money on chromo shafts and high zoot u-joints, but that's just me.

Oh, and leave it locked!


are you using full circle clips to hold the joint caps on?
No, they just press in.

you probably kept the driveline moving after the first crack which then resulted in breaking off the opposite end.

Yeah, also the shaft wants to slide out when the U-joint is gone, and it can contact the outer shaft yoke so whatever is left will grind on each other.

I'd get another stock long side inner and stub shaft along with a Spicer 760X u-joint and tack weld the caps in and see how that goes before I would spend piles of money on chromo shafts and high zoot u-joints, but that's just me.

I just might try that. I threw some cheap U-joints in there previously, that was probably a mistake. Just a small tack to keep the caps in there too huh?

-I had a great time this weekend anyway, I`ll put some pics up soon in my Canadian backroads thread.


I think I am going to pull that detroit out and put in a limited slip or maybe even open.
They'll pop when they want to. I've done it to the short side twice, with a limited slip. The first time it didn't have very much weight on it at all, either.


Join the Elite Explorers for $20 each year.
Elite Explorer members see no advertisements, no banner ads, no double underlined links,.
Add an avatar, upload photo attachments, and more!
.


No, they just press in.
If they dont use a full circle clip, they at least have to use the little moon clip. The little moon clips are bad about jumping off and letting the cap pop out. Once a cap goes, the joint will bind up in the ear and still work until something breaks.

You can machine stock shafts to accept a full circle clip, but i dont like doing it as it makes a weak spot on what is already a weak shaft. Tacking the caps on works, i do a triangle of 3 really hot tacks and take your time inbetween doing each one so you dont burn the seals out of the joints.


Back
Top