turdle's mounty moves on | Page 11 | Ford Explorer Forums - Serious Explorations

  • Register Today It's free!

turdle's mounty moves on

hello all! well, turdle's mounty has come to maryland. i had been tossing around the idea of a really well built suv that didn't cost a fortune. i have a 97 mounty to tow my racecar and it has been a trusty companion for the last 4 years, but the drivetrain, although very reliable, hasn't been very inspiring. so, i had been looking around for options. i settled on the thought of a 347, but the cost was out of my range...until i read about turdle's mounty up for sale. done deal!

now i need to get going on it. work has been crazy for the past month, so i havent been able to get very far and august isn't looking much better, but i am going to try to squeeze in some time.

i thought about fixing up the new mounty and just selling mine, but with all the body work, reassembly of the drivetrain and electrical issues, it would be far less time to swap in the drivetrain. so, i pulled the engine and trans.

let me tell you, that 4406 is a monster! i dont think its going into mine. the shifter location intruded upon my leg space and i like a stock appearance better, so i'm either going to stick with the AWD or swap in a 4405 control trac and use the v-6 radio bezel with the TC control knobs. need to find out if the control trac can hold up to the power of the mighty 347 tho.

i originally thought that the drivetrain was perfect as is, but after looking into it further, the 3k stall torque converter changes the entire ballgame. i found out that a stall converter isnt good for towing and a lumpy cam is no good for a stock stall. so, they both have to go. i picked out a smaller comp cams stick and a hughs towing converter. the trans is good for over 600tq from stock and the art carr shift kit is a great plus, so that will remain as is. again, the 4406 is NOT going into my truck. the next thing i have been considering is a change in the engine lineup. my mustang is built for american iron, except 1 thing. the 408 lump in the engine bay makes waaay too much power. a 347 would be a perfect size. theres more work involved, but a 408 in the mounty would certainly haul my now lighter mustang! yeah, i know. ive been told a hundred times that the 351 will not fit, but im not convinced. with some block huggers instead of the really wild and tangled mess of torque monster headers, it might be easier to get past the steering column and a/c box. i think the box may need to be modified for the valve cover, but it wouldn't be hard to do. good news is i now have lots of spare parts to test with! the oil pan and CPS arent going to be too much of a problem. i could easily modify the pan i have to fit and the CPS doesn't look that hard. i have access to a lathe. its more work, but it solves 2 problems. 1) i want to have a legal american iron car. 2)i love torque and excellent street manners. i can de-cam the **** out of the 408 to idle smooth as glass while never sweating the hills of PA while towing.

if that doesn't work out, so be it, but it would be a cool project! anywho, thats my story. i hope to share the build with you all! thanks to turdle for helping get this thing shipped to me.


Join the Elite Explorers for $20 each year.
Elite Explorer members see no advertisements, no banner ads, no double underlined links,.
Add an avatar, upload photo attachments, and more!
.


Man, this mounty has seen more built motor than any other in existence.

Great work man - Can't wait to hear it fire up.


Join the Elite Explorers for $20 each year.
Elite Explorer members see no advertisements, no banner ads, no double underlined links,.
Add an avatar, upload photo attachments, and more!
.


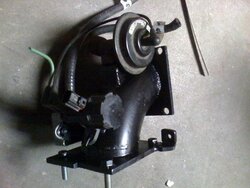
i finished up the intake elbow yesterday. i ended up going with steel as i was able to use materials on hand. it was the right choice anyhow because of all the extra little brackets i had to attach to mount the throttle cable bracket, the EGR valve and the 2 EGR control "thingys". doing that in aluminum would have been incredibly difficult. really happy with the results. everything has a home and it all fits in the package.
 

Attachments

  • intake8.JPG
    intake8.JPG
    67.7 KB · Views: 868
  • intake9.JPG
    intake9.JPG
    78.6 KB · Views: 707
  • intake10.JPG
    intake10.JPG
    71.6 KB · Views: 657
  • intake11.JPG
    intake11.JPG
    69.7 KB · Views: 774


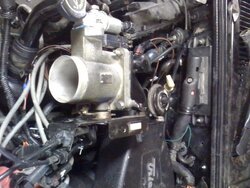
oh, and as you can see, i got the throttle body lever worked out too. i grafted a stock lever arm onto the BBK throttle body.

also, i attempted to start the truck for the first time. i primed the pump, mounted the coil packs and ran the plug wires. couldn't get the starter to turn over the engine. it turned over by hand (wrench, really). there was enough power from the battery. i got new battery cable ends. i pulled the starter and it tested good at autozone. i think its the cable. i will have some more time on thursday night to work on it again. i will get this mother started!


Looks nice Steve!!

I had a slight issue with the braided lead on the starter itself not making good contact. I thought it was sorted out. Check this---


nice work on the elbow and TB. Good luck

Ditto, great work on that elbow etc.

Try to replace the cables when you can, using the bolt on ends is a bad idea. They corrode over time.


Ditto-nice work!


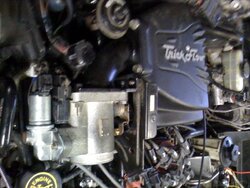
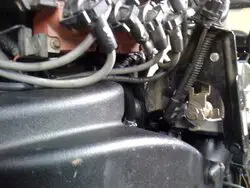
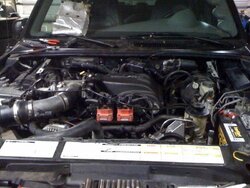
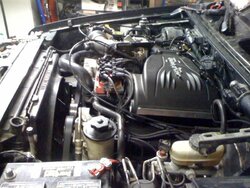
well, i got some time last night in the garage. i started with trying to figure out what was wrong with the starter wiring. well, as it turns out, nothing. Jon, i'm glad you said something about the starter previously having intermittant problems. i would have been chasing my tail until i replaced everything. the starter was bad. even though it tested good at autozone and again tested good hanging from the wires with a jumper cable on the body to make the ground. but bad after reinstalling and then after pulling it for the 4th time. ran out and got a new starter and all was good. would you believe the engine roared to life after only about 10 seconds worth of cranking?! friggin amazing! i didn't run it for long because i didn't have coolant in, but it sounded healthy. here's a couple of final assembly pics in the engine bay. it really doesn't look far from stock!. the only real giveaway is the "trick flow". if that wasn't there, it wouldn't look even slightly suspicious. next is the exhaust. tubing, cats, bungs and mufflers are being dropped at my doorstep today:)
 

Attachments

  • 408 finished1.JPG
    408 finished1.JPG
    76.3 KB · Views: 661
  • 408 finished2.JPG
    408 finished2.JPG
    86 KB · Views: 587


also, theres another gameplan change. after pricing out all the parts needed to make the Turdle whole again and fixing all the cosmetic issues, i'd be in the hole another 2 grand. that idea sucked to me, but since i didn't have any other form of transportation than my mounty, i couldn't use my truck...until now. i now have alternate transportation:) so, when the exhaust is done, the whole thing is being torn out and the swap scenaro starts over again. yes, i could have sold my truck to pay for the work to the Turdle, but then i'd have a salvage title and a maaco paint job.


Wow, you sure demonstrate a great amount of determination and effort in what you have done and plan to do!

So you have found a new explorer/mountaineer to swap the powertrain into?

This sure is interesting to watch from the sidelines and I hope you can accomplish your goal sooner than later.


so, over the weekend, i got the exhaust sorta done. i say sorta because i didn't start the tailpipe and right now the front tubes just slip into the cats. i need to figure out how best to bolt them together...flanges or v-band clamps or ball&socket or...

i didn't have any good pics because of low light, so, you'll just have to imagine for now. i am not really happy with how far the cats are from the headers. they reside just after the trans crossmember. that was the first available place to hold both of them. i am not sure how that effects emissions, but it is what it is. both pipes coming from the headers to the cats have their own flex joints to allow for misalignment with the v-band clamps to the headers. beyond the cats, which sit side by side with about a 30degree angle off vertical and about an inch of offset from the inlets. they feed into the two 70 series flowmasters which sit in the vertical position next to eachother and welded together via welded straps across the ends. i used the factory hanger locations at the rear of the muffler weldment. i plan to suspend the front end (the cats) from the hangers at the trans crossmember.

i started it up to hear what my exhaust will sound like. well, its not at all what i planned on. i really hope the tailpipe can kill some of that sound. its far too loud for what is supposed to be a daily driven sleeper. but, it was quiet enough to notice rocker arm slap that i didn't notice when i started it with just headers. i have to say, i f-ing hate these retrofit linkbar lifters! this is the 3rd cam this engine has seen and EVERY time, i have had to tear the valvecovers off at least once to get them adjusted properly. i do it according to their specs every time, but it never works out. really pisses me off. there is alot of stuff that needs to be removed to get to these valvecovers.


Wow - just saw this post for the first time. I have been out of the loop for last 9 months working over in Chicago. I am back now though and after reading through this thread, I am even more excited to get back to the Ranger! Funny how you went through all the same issues, etc I found along the way. Nice solutions. Sometimes I wish I would have just did the pan like you did. When I tried, the pan twisted into a mess - not planning ahead with the welding heat!

Headers turned out nice as well. Need to get a few more pictures of them. For what it is worth, my headers are for the "stock" look / engine bay. Like you, that has always been my quest. Keep everything - A/C, etc.. I have the inner fenders as well. I did have to move the trans cooling lines and the fuel lines to fit, but they fit in stock engine bay and they are removable. I put them in and out of the Ranger when I was making them. The slip fit collectors were the key - I cam put them in one tube at a time.

I am excited to read more about the finished project! Did I miss the discussion about the A/C lines? They need to be lengthened right?

GREAT WORK AND PROGRESS!!!

Todd


PS: If you read the first line of my signature, my interests may drift from the 351W AWD Ranger if I can find a Saleen Series VI supercharger at a good price! Check out the Brenspeed Mountaineer...


thanks todd.
i looked alot at your build for reference material, so thanks for starting it first! yeah, the a/c line did need to be stretched. i didn't really notice that issue until i tried to put the upper radiator hose on and found out the bend came out just above the t-stat housing. i guess i forgot to mention it. not really sure how to handle it though. figured i'd try just using hose with double hose clamps. i may have to have a custom one made up.

i didn't realize your headers were intended to work with a mostly stock engine bay. i did wonder how you were going to get them in and out. slip fit primaries was a good solution. any worries about them leaking too much?

yeah, the oil pan success was a mix of heat management, a good TIG welder and some straightening afterwards. i think using the factory rail stiffener was key in taking up any left over waviness.

glad to see you back on the forums. i had hoped you would chime in for advice quite a few times.


Ditto Todd, it's good to hear from you.


For the A/C lines, I had planned to cut the aluminum and tig weld in a short piece to extend them. I would never trust clamps. I believe now you can get Aeroquip A/C line parts to use with their braided line. Thought I saw that someone recently.

Now, if we could just get out from the foot of snow hanging out here I would love to get back to the truck!


CRAAAAAPPPPP! so, i've been a bit laxidasical on the build over the past few weeks. just needed a break from it. i keep feeling close to a test drive, but every time i think im getting closer, i find more i need to do. frustrating to say the least. well, now i am about to freak out. i just got an accepted offer on a new house. i had no doubt the offer wouldn't be accepted and it was out of my mind and life moved on. well, last night, i found out they accepted and soon realized i have sooo much work to do before the closing at the end of april. i need this truck running...like done, done. ya know? and i have a ton of house work to do to prepare my current house to rent. and i need to get the garage packed up for the haul...this is a fully stocked garage. air lines, shop lights, all the tools. and piles of spare parts intended for ebay!

i figured on having this project done by may 1st and then starting on the house projects. now, it looks like i need this truck done by mid march to be able to get it all sorted out by moving day. and to make matters worse, this is a gated golf community we are moving to. one that would balk at half torn apart vehicles in the driveway and all night banging noises coming from the garage.

i am having a minor panic attack right now! how on earth am i supposed to finish and prove out the drivetrain, then swap it into another truck, with all the bugs worked out in 1 month?


two options come to mind if it were me in your position. I would work on getting it fixed, but not necessarily debugged. Bugs you should work on would be mechanical and electrical, not fitment bugs or clamps or things like that because that will need to be adjusted to fit the new truck. But completing the main parts and then swapping the drive train into the new explorer for fitment and final debug.

Or, i would just keep the 408 in the existing mounty debug it and fix everything and run with it from there until you get to know your neighbors and time at the new place to swap things over.

Just my suggestions, You're doing a great job, keep it up!

Justin


strict covenants

I live in a subdivision with strict covenants that prohibit working on vehicles as well as having vehicles outside the garage unless it is full. I get around the restrictions by only having three vehicles at any particular time. I park my project vehicle and my wife's vehicle in the garage. I park my driving vehicle in the driveway behind the project vehicle. I keep the garage door closed when working on my project vehicle except when I have to run the engine. I don't run it at high rpms or with the exhaust disconnected. So far I have not experienced any complaints.

I suggest that you focus on getting your house prepared to rent and getting ready for your move. If you have time left then get the project vehicle drivable. My last project vehicle was delivered to my house by a tow vehicle. I immediately pushed it into the garage.


puffer sounds like you got lots to do with a short period of time..lol...man if you ever need any help small or big just say something my way and i can help(Auto,etc)..I am just around the corner and really dont kno anyone my way with any X's..I am always up for helping other X owner..lol


Join the Elite Explorers for $20 each year.
Elite Explorer members see no advertisements, no banner ads, no double underlined links,.
Add an avatar, upload photo attachments, and more!
.


ok, so i need all hands on deck. the truck is ready for some test driving, but i can get the idle to calm down and i have 6 codes.

symptoms:
cold starts just fine. idle is a bit low and it struggles a bit. throttle stabs are responsive. then, it gets a little heat in it (not enough to register on the gauge yet though) and it surges to 2000rpm and stays there. no codes are thrown. when i put it into drive, it engages and lunges but then lacks go shortly after. reverse does the same thing. after going forward and backward about 6 inches, it immediately throws codes like confetti and the engine wont rev well.

codes:
P1747 trans press. (EPC) fault
P0750 shift sol. A malf.
P0755 shift sol. B malf.
P0743 tq conv circuit fault
P0340 cam sensor fault
P1451 EVAP fault

the EVAP is a known problem. i broke a hose during the install.

reading on the P1747, it says it makes the engine go to limp mode and the shifting irregular. this sounds an awful lot like what is happening once i put it into gear, but it doesn't tell me what is making the high idle. i believe i have 2 separate problems.

lets start with the high idle. i lowered the idle screw as far as it would go and the idle air screw all the way in (SN95 TB). i disconnected the IAC. i tried different fuel pressures. vacuum reads 20in at 2k rpm. i don't know if the A/F meter is functional, but its pegged at pig rich all the time. even when the engine is off with the key on. i plan to check the TPS idle voltage tomorrow. anything else to check? am i missing some variable? i only see so many ways to raise the idle. 1)allow more air in via TB, IAC or a leak, but 20in vacuum at 2k rpm is alot if there was a leak, right? 2)add more fuel. cant see why the computer would do this since it had a good idle with the last engine?

second, the trans. it sounds like it is usually faulty wiring. i will double check connections tomorrow as well. thats all i got.

this is your time to shine people!


Back
Top