LD50 Full-size axle thread `93 Ex | Page 9 | Ford Explorer Forums - Serious Explorations

  • Register Today It's free!

LD50 Full-size axle thread `93 Ex

LD50 Full-size axle thread `93 Ex SAS

Hey fellow Explorer enthusiasts!

Well I never thought I`d do it, but it`s time.
I originally thought I would go to a smaller rig one day but I`m going to beef up the Explorer instead. Since I already have a huge thread on my previous work I decided to start fresh.

If you would like to see my previous mods, you can navigate from my signature link, or click here:
http://www.explorerforum.com/forums/showthread.php?p=523171#post523171

~

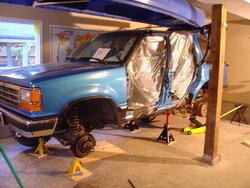
My plans are to install a D44 and 9-inch into the station wagon and run 35 inch tires. Hopefully she`ll still get in the garage, but if it don`t then oh well. During this I also have some body work to do.

Right now I have the rear end out, I took off the spare tire hanger and removed the muffler and rear most heat shield. (doors are off for body work)Next the gas tank comes out so I can prep the underside for rust protection, from the t-case back. In the meantime I am trying to sell some parts for cash.

First big decision is what gear ratio. The 4.10`s on 33s was nice, but I think I`d like a bit more torque than that so I`m thinking 4.88 or 5.13s.
 

Attachments

  • prep.JPG
    prep.JPG
    62.9 KB · Views: 10,432


Join the Elite Explorers for $20 each year.
Elite Explorer members see no advertisements, no banner ads, no double underlined links,.
Add an avatar, upload photo attachments, and more!
.


I don`t see myself ever selling, way too many good times in it, man I even went to Moab in it! if stuff breaks I will just replace.

Hey Froader, I`ve been modifying the coil towers and realize there is a question I need to ask that doesn`t show in your pic.
where are you holding the bottom of the tape? I assumed it was resting on the coil seat, but if it is under the seat, I`m probly over 1/2 inch out in my calculations. (I am actually hoping you rested it on the seat)

-thanks


Join the Elite Explorers for $20 each year.
Elite Explorer members see no advertisements, no banner ads, no double underlined links,.
Add an avatar, upload photo attachments, and more!
.


Got the passenger side coil tower welded up.
I have an elongated bolt hole in the bottom (under frame) that comes from filing out the middle of two holes I drilled. I marked it out through the hole that the stock explorer bump stops used to bolt through.
This will help for front to back fine tuning,
I want to let it down on the springs and see how it sits before drilling the final bolt holes. I will just bolt the bottom of them to check.

-The tape says 9 1/2"
 

Attachments

  • PScoil bucket1.JPG
    PScoil bucket1.JPG
    71.2 KB · Views: 984
  • PScoil bucket2.JPG
    PScoil bucket2.JPG
    56.8 KB · Views: 885


I cut 3 inches off from the forward side on a 5* angle going back.
The angle will fit the frame and hold the tower straighter.
I did the cut on the band saw you saw me cut my cat with earlier.
I bolted the two coil towers together and cut them at the same time with the bolt-up surface dead flat.
The 5* angle is then reversed to the other coil tower for that build.
 

Attachments

  • PScoil bucket3.JPG
    PScoil bucket3.JPG
    41.5 KB · Views: 875


It measures 18 inches for the coils now.
I still have to work on the other side tower which as a lot of people know is tricky because of the odd shape to the frame there.
 

Attachments

  • PScoil bucket4.JPG
    PScoil bucket4.JPG
    38.4 KB · Views: 879


I like your coil buckets. Very nice. wish i had thought about that myself.


How much did you trim off the bottom of the coil buckets? Mine hang down and are out of the way but it would look better with them not hanging down so much.


Thanks Froader, that`s where I measured to basically.
burns, 3 inches off, give or take. And that is 3 inches from the forward most side, with a 5* incline to back, aproximately.

OR, 9.5 inches down from where the bucket angles inward (on the rearward side of bucket), with a 5* decline. As you could see in this pic...


attachment.php


How much I cut means nothing without more measurements I guess.

28 1/2" from ground to upper shackle hole center -for rear height reference (sitting on old tires)

13 3/8" from ground to centers of both axles.

And to summarise:

Of course I had to start somewhere, so as some may already know I just put the old tires I got with the rear axle on the back, and made sure the front axle was at the same height. Then I moved the front end to where I thought the stance looked best, -at slight downward angle. Then lined everything according to that for my radius arm mount.
Then the all-important 18" spring compression measurement was used to decide coil bucket placement. They did in fact compress that far and the truck sits at 26" from ground to bottom of forward crossmember, just as I had planned, as indicated in the attached pic.

Of course with new tires these height measurements will increase, and are only relevant to the process.
 

Attachments

  • 26 inches front.JPG
    26 inches front.JPG
    50.4 KB · Views: 843


exciting! :D


Still have to mount my shock towers and trackbar bracket, but I buffed up and POR15-inated what I could and mounted the towers with grade 8 hardware. The more astute might eventually notice that the washers aren`t grade 8, but that was all they had at the part store, and I don`t think it`s essential.

My adjustable trackbar won`t show up for a couple weeks and $ is tight for the project so I might do more work on the engine crossmember next.

The "bumperjack" I found at work is awesome for quickly moving the front end up and down. I don`t know who made this one, it`s so old I can`t read the nameplate..
 

Attachments

  • bucket mounted1.JPG
    bucket mounted1.JPG
    71.6 KB · Views: 824
  • bumperjack1.JPG
    bumperjack1.JPG
    63.5 KB · Views: 1,435
  • bumperjack2.JPG
    bumperjack2.JPG
    63.7 KB · Views: 828


yep their pretty nice...


hahahaha happy birthday...now finish......


happy birthday


Thanks, but don`t forget... It`s William H. Macy`s Birthday too!
 

Attachments

  • macy2.jpg
    macy2.jpg
    19.2 KB · Views: 785


Join the Elite Explorers for $20 each year.
Elite Explorer members see no advertisements, no banner ads, no double underlined links,.
Add an avatar, upload photo attachments, and more!
.


I just saw him in Wild Hogs.. decent flick


Back
Top